Zabbix 集成 OpenLDAP

zabbix配置LDAP还是比较简单的,我们直接使用最外层的用户授权即可,不用在LDAP上对用户进行分组管理,因为zabbix自身还会有一层授权控制。

一、zabbix 配置 openldap 认证
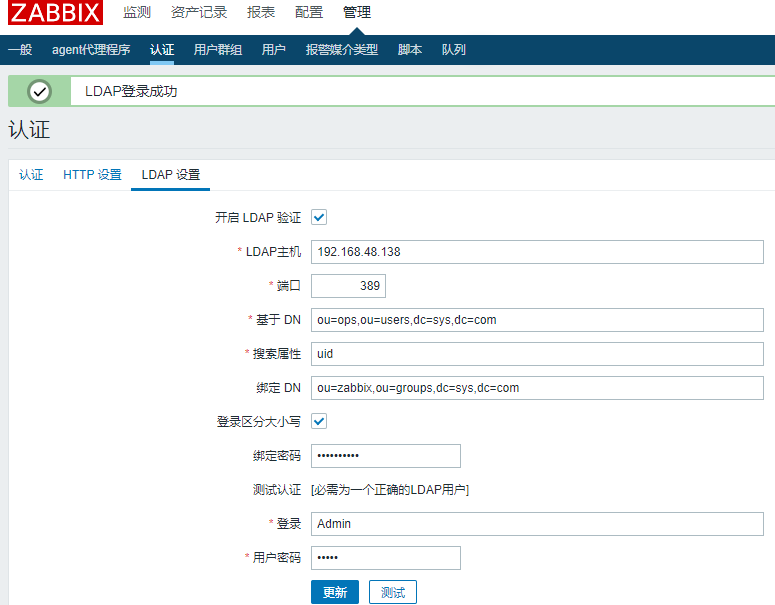
图片1

  • LDAP主机:可以填IP或域名
  • 端口:默认389
  • 基于DN:此处填写 ou=ops,ou=users,dc=sys,dc=com,表示用户基于ops这一分组下维护
  • 搜索属性:uid
  • 绑定DN:此处填写 ou=zabbix,ou=groups,dc=sys,dc=com,表示绑定一个用于查询LDAP的账户
  • 绑定密码:这里填上面绑定DN是ou=zabbix的密码
  • 登陆:Admin,这个用户与zabbix管理账户重叠,但是要注意需要先在LDAP中创建此用户,并设置密码
  • 用户密码:将上一步创建用户的密码写在这里,点击测试,如果配置正确,将会提示LDAP登录成功

二、python 导入 ldap 用户

上述配置完成后已经把ldap和zabbix打通了,用户登录zabbix时,会先到ldap认证,判断用户是否有效;但是zabbix不会把ldap的用户同步过了,你要登录,得先在zabbix上创建和ldap内同名的用户才行,这个显得很被动了,于是写个脚本,定时往zabbix数据库插入用户,这样就免去手工创建的用户的烦恼。下面是脚本:(环境是python2.6)

ldap命令看到的数据

1
2
3
4
5
6
7
8
9
[admin@localhost ~]$ ldapsearch -x -LLL -H ldap:// -b ou=users,dc=sys,dc=com -D "cn=admin,dc=sys,dc=com" -w "Abc.123456" givenName|sed '1,12'd|sed '/^$/d'|egrep -v 'ou=Group|ou=machines'
dn: uid=dev1,ou=dev,ou=users,dc=sys,dc=com
givenName: dev1
dn: uid=ops1,ou=ops,ou=users,dc=sys,dc=com
givenName: ops1
dn: uid=ops2,ou=ops,ou=users,dc=sys,dc=com
givenName: ops2
dn: uid=ops3,ou=ops,ou=users,dc=sys,dc=com
givenName: ops3

cn是zabbix的alias字段,givenName需要base64解码成中文名

1
2
3
4
5
6
7
8
9
10
11
12
13
14
15
16
17
18
19
20
21
22
23
24
25
26
27
28
29
30
31
32
33
34
35
36
37
38
39
40
41
42
43
44
45
46
47
48
49
50
51
52
53
54
55
56
57
58
59
60
61
62
63
#!/usr/bin/env python
# -*- coding:utf-8 -*-

import pymysql
import commands
import re
import base64
import sys

# 避免中文乱码
reload(sys)
sys.setdefaultencoding('utf-8')

ldap_list='/usr/local/zabbix/sh/ldap.list'

# 先从ldap服务器把用户数据导入文件
ldap_users=commands.getoutput("ldapsearch -x -LLL -H ldapsearch -x -LLL -H ldap:// -b ou=users,dc=sys,dc=com -D "cn=admin,dc=sys,dc=com" -w "Abc.123456" givenName|sed '1,12'd|sed '/^$/d'|egrep -v 'ou=Group|ou=machines'> %s" % ldap_list)

# 因为zabbix的表没有自增id,所以每次操作都会记录下id,并递增
idfile = '/usr/local/zabbix/sh/userid'

# 处理元数据,把文件里的每行数据转化成方便使用的格式
def get_item(fobj):
item = ['', '', '']
for no,line in enumerate(fobj):
#print no,line
slot = no % 2
item[slot] = line.rstrip()
if slot == 1:
yield item

def insert_user():
conn = pymysql.connect(host='192.168.48.133', port=3306, user='zabbix', passwd='zabbix', db='zabbix', charset='utf8')
cur = conn.cursor()
fs = open(idfile,'r')
n = int(fs.read())
fs.close()
with open(ldap_list) as fobj:
for item in get_item(fobj):
n += 1
try:
s='{0}{1}{2}'.format(*item)
l = re.search('cn=(.*),ou.*:: (.*)',s)
name = base64.b64decode(l.group(2))
alias = l.group(1)
search = cur.execute("""select * from users where alias = %s""", (alias, ))
if not search:
sql = "insert into users(userid,name,alias) values ('%s','%s','%s');" % (n,name,alias)
insert = cur.execute(sql)
if sql:
print "User %s Add Succed!" % alias
print sql
except AttributeError as e:
print e
conn.commit() #这步很必要,不然插入的数据不生效
cur.close()
conn.close()
fe = open(idfile,'w')
fe.write(str(n))
fe.close()

if __name__ == '__main__':
insert_user()

执行

1
[admin@localhost ~]$ python insert_sql.py

再去user下看,可以看到新增了很多用户

图片2

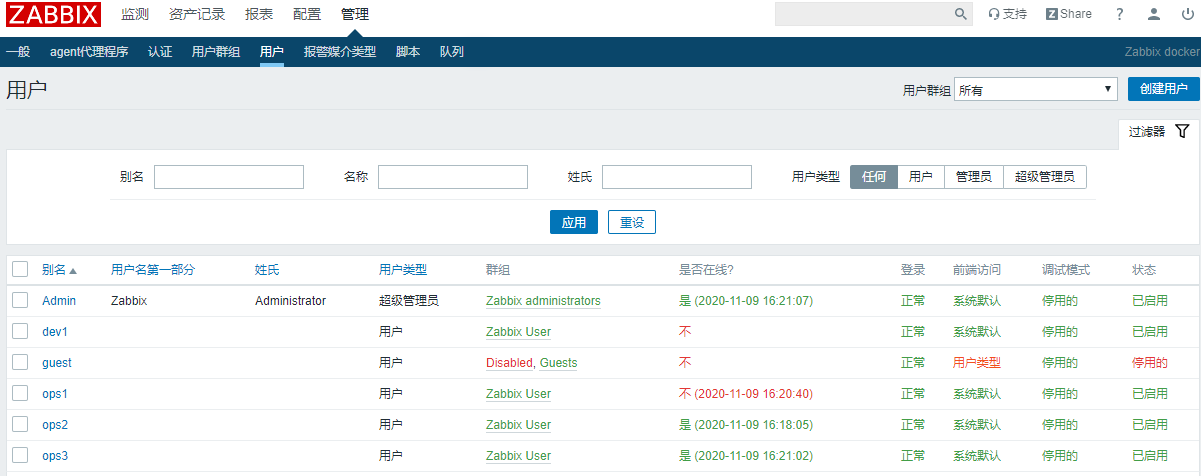
登录下,认证是成功的,接下来,你可以对用户进行分组和授权了

三、zabbix认证方式修改

当出现网络故障或LDAP服务不可用时,zabbix系统便无法登录,这里可以通过修改zabbix数据库的方式更改认证方式

查看认证方式

1
2
3
4
5
6
7
> select authentication_type  from config;
+---------------------+
| authentication_type |
+---------------------+
| 0 |
+---------------------+
1 row in set (0.001 sec)

修改认证方式

1
> update config set authentication_type=0;   # 可修改值为  0, 1, 2
  • 0 内置
  • 1 LDAP
  • 2 HTTP
-------------本文结束感谢您的阅读-------------