Prometheus + grafana + node_export监控系统部署

1.架构原理

1.1 Prometheus 介绍

Prometheus (中文名:普罗米修斯)是由 SoundCloud 开发的开源监控报警系统和时序列数据库(TSDB)。

自2012年起,许多公司及组织已经采用 Prometheus,并且该项目有着非常活跃的开发者和用户社区。现在已经成为一个独立的开源项目。

Prometheus 在2016加入 CNCF ( Cloud Native Computing Foundation ),作为在 kubernetes 之后的第二个由基金会主持的项目。 Prometheus 的实现参考了Google内部的监控实现,与源自Google的Kubernetes结合起来非常合适。

另外相比influxdb的方案,性能更加突出,而且还内置了报警功能。它针对大规模的集群环境设计了拉取式的数据采集方式,只需要在应用里面实现一个metrics接口,然后把这个接口告诉Prometheus就可以完成数据采集了

1.2 各个组件的功能

node-exporter组件:负责收集节点上的metrics监控数据,并将数据推送给prometheus
prometheus:负责存储这些数据
grafana:将这些数据通过网页以图形的形式展现给用户。

1.3 架构图
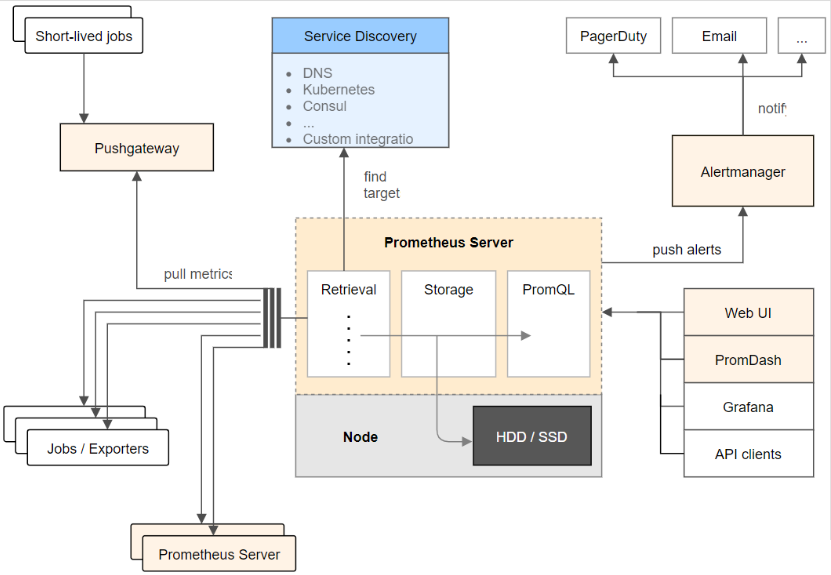
1.4 Prometheus的特点

1、多维数据模型(时序列数据由metric和一组key/value组成)
2、在多维度上灵活的查询语言(PromQl)
3、不依赖分布式存储,单主节点工作.
4、通过基于HTTP的pull方式采集时序数据
5、可以通过中间网关进行时序列数据推送(pushing)
6、目标服务器可以通过发现服务或者静态配置实现
7、多种可视化和仪表盘支持

Prometheus生态系统由多个组件组成,其中许多是可选的:
1、Prometheus 主服务,用来抓取和存储时序数据
2、client library 用来构造应用或 exporter 代码 (go,java,python,ruby)
3、push 网关可用来支持短连接任务
4、可视化的dashboard (两种选择,promdash 和 grafana.目前主流选择是 grafana.)
4、一些特殊需求的数据出口(用于HAProxy, StatsD, Graphite等服务)
5、实验性的报警管理端(alartmanager,单独进行报警汇总,分发,屏蔽等 )

promethues 的各个组件基本都是用 golang 编写,对编译和部署十分友好.并且没有特殊依赖.基本都是独立工作。

2.Prometheus 监控系统部署

用到的组件:

prometheus:开源监控系统

node_exporter:服务器端agent,负责采集服务器基础监控项

grafana:一个开源的度量分析与可视化套件,常用于展示监控信息

2.1 部署prometheus

2.1.1 下载安装prometheus

1
2
3
[root@prometheus prometheus]$ wget https://github.com/prometheus/prometheus/releases/download/v2.7.2/prometheus-2.7.2.linux-amd64.tar.gz
[root@prometheus prometheus]$ tar zcf prometheus-2.7.2.linux-amd64.tar.gz
[root@prometheus prometheus]$ mv -f prometheus-2.7.2.linux-amd64 /work/admin/prometheus

2.2.2 修改prometheus配置文件prometheus.yml

1
2
3
4
5
6
7
8
9
10
11
12
13
14
15
16
17
18
19
20
21
22
23
24
25
26
27
28
29
30
31
32
33
34
35
[root@prometheus prometheus]$ vim prometheus.yml
# 全局配置
global:
scrape_interval: 15s # 设置抓取(pull)时间间隔,默认是1m
evaluation_interval: 15s # 设置rules评估时间间隔,默认是1m
# scrape_timeout is set to the global default (10s).

# 告警管理配置
alerting:
alertmanagers:
- static_configs:
- targets: ['127.0.0.1:9093']
# - alertmanager:9093

# 加载rules,并根据设置的时间间隔定期评估
rule_files:
- "/work/admin/prometheus/alerts/*.rules"
# - "second_rules.yml"

# 抓取(pull),即监控目标配置
# 默认只有主机本身的监控配置
scrape_configs:
# 监控目标的label(这里的监控目标只是一个metric,而不是指某特定主机,可以在特定主机取多个监控目标),在抓取的每条时间序列表中都会添加此label
- job_name: 'prometheus'

# metrics_path defaults to '/metrics'
# scheme defaults to 'http'.

# 可覆盖全局配置设置的抓取间隔,由15秒重写成5秒。
scrape_interval: 5s

# 静态指定监控目标,暂不涉及使用一些服务发现机制发现目标
static_configs:
- targets: ['localhost:9090']
# (opentional)再添加一个label,标识了监控目标的主机

修改完后检查下配置文件有没有错误

1
./promtool check config prometheus.yml

2.2.3 启动prometheus默认监听9090端口

1
2
[root@prometheus prometheus]$ cd /work/admin/prometheus
[root@prometheus prometheus]$ ./prometheus --web.enable-lifecycle --web.enable-admin-api --config.file=prometheus.yml

这里–web.enable两个参数开启了api管理功能,后面修改完配置文件可以使用post请求动态更新,不需要再重启服务了

1
curl -X POST http://127.0.0.1:9090/-/reload

2.2 部署node_export

2.2.1 安装node_exporter,启动后默认监听9100端口

1
2
3
4
[root@prometheus prometheus]$ wget https://github.com/prometheus/node_exporter/releases/download/v0.16.0/node_exporter-0.16.0.linux-amd64.tar.gz
[root@prometheus prometheus]$ tar xf node_exporter-0.16.0.linux-amd64.tar.gz
[root@prometheus prometheus]$ mv -f node_exporter-0.16.0.linux-amd64 /work/admin/node_export
[root@prometheus prometheus]$ /work/admin/node_exporter/node_exporter

2.3 部署grafana

2.3.1 安装grafana,启动后默认监听3000端口

1
2
3
4
[root@prometheus prometheus]$ wget https://dl.grafana.com/oss/release/grafana-6.0.0.linux-amd64.tar.gz
[root@prometheus prometheus]$ tar xf grafana-6.0.0.linux-amd64.tar.gz
[root@prometheus prometheus]$ mv -f grafana-6.0.0.linux-amd64 /work/admin/grafana
[root@prometheus prometheus]$ /work/admin/grafana/bin/grafana-server web

2.4 增加node_export监控

修改prometheus配置文件增加node_export的监控指标

1
2
3
4
5
6
7
scrape_configs:
# The job name is added as a label `job=<job_name>` to any timeseries scraped from this config.
- job_name: 'node_exporter'

static_configs:
- targets: [‘localhost:9100']
labels: {cluster: 'product',type: 'basic',env: 'prometheus',job: 'prometheus',export: 'prometheus'}

配置grafana

访问localhost:3000 添加数据源(默认用户密码都是admin),推荐展示样式选择Node Exporter Full

添加后的效果图
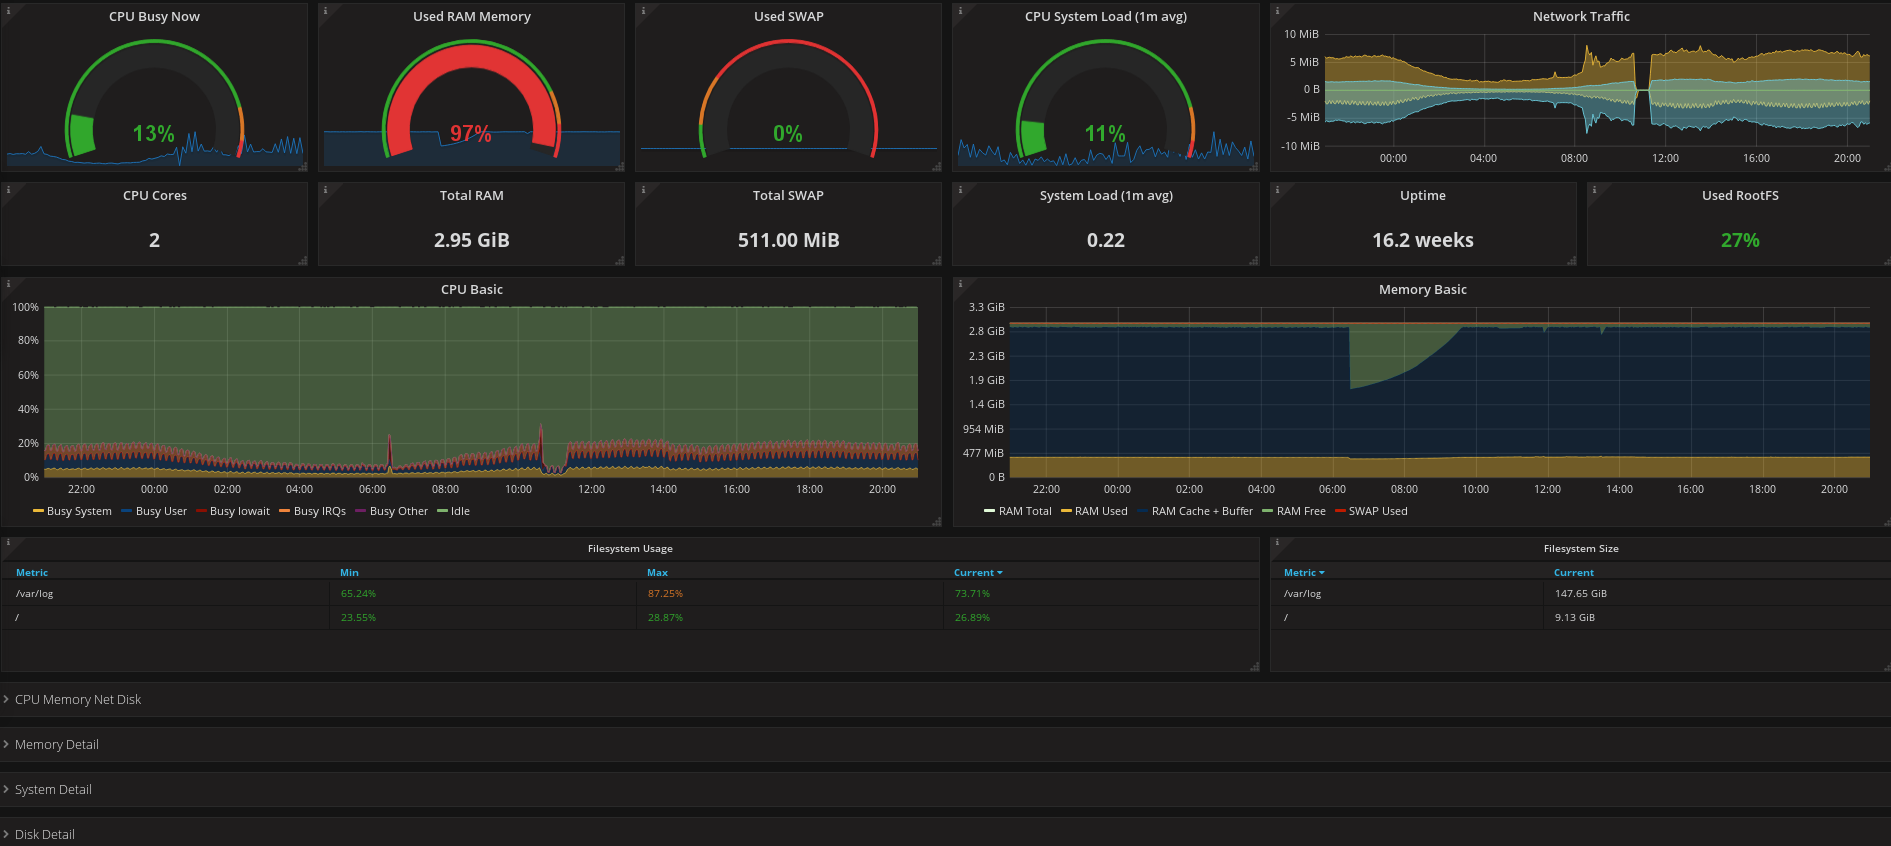
2.5 配置各组件开机启动

这里我使用supervisor来管理服务启动

1
2
[root@prometheus prometheus]$ sudo pip install supervisor
[root@prometheus prometheus]$ echo_supervisord_conf > supervisor/supervisor.conf

修改 supervisor.conf 添加下列配置

1
2
3
4
5
6
7
8
9
10
11
12
13
14
15
16
17
18
19
20
21
22
23
[program:prometheus]
command=/work/admin/prometheus/prometheus --config.file=/work/admin/prometheus/prometheus.yml --storage.tsdb.path=/work/admin/prometheus/data --storage.tsdb.retention.time=60d --log.level=info --web.enable-lifecycle --web.enable-admin-api
directory=/work/admin/prometheus
redirect_stderr=true
autorestart=true

[program:node_exporter]
command=/work/admin/node_exporter/node_exporter
directory=/work/admin/node_exporter
redirect_stderr=true
autorestart=true

[program:grafana]
command=/work/admin/grafana/bin/grafana-server web
directory=/work/admin/grafana
redirect_stderr=true
autorestart=true

[program:alertmanager-0.18.0]
command=/work/admin/alertmanager-0.18.0/alertmanager --config.file=/work/admin/alertmanager-0.18.0/alertmanager.yml --storage.path=/work/admin/alertmanager-0.18.0/data/
directory=/work/admin/alertmanager-0.18.0
redirect_stderr=true
autorestart=true

添加supervisor开始启动

1
2
3
4
5
6
7
8
9
10
11
12
13
14
15
16
[root@prometheus prometheus]$ vim /usr/lib/systemd/system/supervisord.service

[Unit]
Description=Supervisor daemon

[Service]
Type=forking
ExecStart=/usr/bin/supervisord -c /work/admin/supervisor/supervisor.conf
ExecStop=/usr/bin/supervisorctl shutdown
ExecReload=/usr/bin/supervisorctl reload
KillMode=process
Restart=on-failure
RestartSec=42s

[Install]
WantedBy=multi-user.target
1
2
[root@prometheus prometheus]$ sudo systemctl enable supervisord
[root@prometheus prometheus]$ systemctl is-enabled supervisord
-------------本文结束感谢您的阅读-------------