1、MySQL主从复制原理
Mysql内建的复制功能是构建大型,高性能应用程序的基础。将Mysql的数据分布到多个系统上去,这种分布的机制,是通过将Mysql的某一台主机的数据复制到其它主机(slaves)上,并重新执行一遍来实现的。复制过程中一个服务器充当主服务器,而一个或多个其它服务器充当从服务器。主服务器将更新写入二进制日志文件,并维护文件的一个索引以跟踪日志循环。这些日志可以记录发送到从服务器的更新。当一个从服务器连接主服务器时,它通知主服务器从服务器在日志中读取的最后一次成功更新的位置。从服务器接收从那时起发生的任何更新,然后封锁并等待主服务器通知新的更新。
请注意当你进行复制时,所有对复制中的表的更新必须在主服务器上进行。否则,你必须要小心,以避免用户对主服务器上的表进行的更新与对从服务器上的表所进行的更新之间的冲突。
1.1 MySQL支持复制的类型
MySQL支持复制的类型也就是二进制日志格式:
- 基于语句的复制: 在主服务器上执行的SQL语句,在从服务器上执行同样的语句。MySQL默认采用基于语句的复制,效率比较高
- 基于行的复制:把改变的内容复制过去,而不是把命令在从服务器上执行一遍. 从mysql5.0开始支持
- 混合类型的复制: 默认采用基于语句的复制,一旦发现基于语句的无法精确的复制时,就会采用基于行的复制。
1.2 复制的特点
- 数据分布
- 负载均衡
- 备份
- 高可用性
1.3 复制过程如下
Mysql的复制(replication)是一个异步或半同步的复制,从一个Mysql 实例(称之为Master)复制到另一个Mysql 实例(称之Slave)。实现整个复制操作主要由三个进程完成的,其中两个进程在Slave(Sql进程和IO进程),另外一个进程在 Master(IO进程)上。
要实施复制,首先必须打开Master端的binary log(bin-log)功能,否则无法实现。因为整个复制过程实际上就是Slave从Master端获取该日志然后再在自己身上完全顺序的执行日志中所记录的各种操作。
具体过程如下:

- master记录二进制日志。在每个事务更新数据完成之前,master在二日志记录这些改变。MySQL将事务串行的写入二进制日志,即使事务中的语句都是交叉执行的。在事件写入二进制日志完成后,master通知存储引擎提交事务。
- slave将master的binary log拷贝到它自己的中继日志。首先,slave开始一个工作线程——I/O线程。I/O线程在master上打开一个普通的连接,然后开始binlog dump process。Binlog dump process从master的二进制日志中读取事件,如果已经跟上master,它会睡眠并等待master产生新的事件。I/O线程将这些事件写入中继日志。
- SQL slave thread(SQL从线程)处理该过程的最后一步。SQL线程从中继日志读取事件,并重放其中的事件而更新slave的数据,使其与master中的数据一致。只要该线程与I/O线程保持一致,中继日志通常会位于OS的缓存中,所以中继日志的开销很小。
2、读写分离原理
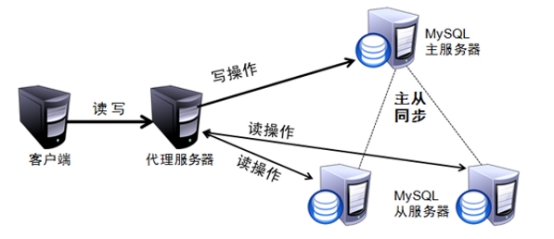
简单来说,读写分离(如下图:)就是只在主服务器上写,只在从服务器上读,基本的原理是让主数据库处理事务性查询,而从数据库处理select查询,数据库复制被用来把事务性查询导致的变更同步到集群中的从数据库。

3、3种实现思路关键技术
3.1 基于程序代码内部实现
在代码中根据select、insert进行路由分类,这类方法也是目前生产环境应用最广泛的,优点是性能较好,因为在程序代码中实现,不需要增加额外的设备作为硬件开支;缺点是需要开发人员来实现,运维人员无从下手。
3.2 基于中间代理层实现
代理一般位于客户端和服务器之间,代理服务器接到客户端请求后通过判断后转发到后端数据库,有两个代表性程序。
- MySQL-Proxy:MySQL-Proxy为MySQL开源项目,通过其他自带的lua脚本进行SQL判断,虽然是MySQL官方产品,但是MySQL官方并不建议将MySQL-Proxy用到生产环境。
- Amoeba:由陈思儒开发,作者曾就职于阿里巴巴。该程序由java语言进行开发,阿里巴巴将其用于生产环境。它不支持事务和存储过程。
3.3 驱动实现
在驱动层使用Mysql提供的主从库访问驱动,直接与数据库连接驱动耦合,扩展性弱,目前还未做原型尝试。
4、Amoeba是什么
Amoeba(变形虫)项目,该开源框架于2008年开始发布一款Amoeba for Mysql软件。详细资料可参阅Amoeba官方文档(需翻墙)。
4.1 Amoeba能做什么
Amoeba致力于MySQL的分布式数据库前端代理层,它主要在应用层访问MySQL的时候充当SQL路由功能,专注于分布式数据库代理层 (Database Proxy)开发。座落与 Client、DB Server(s)之间,对客户端透明。具有负载均衡、高可用性、SQL过滤、读写分离、可路由相关的到目标数据库、可并发请求多台数据库合并结果。 通过Amoeba你能够完成多数据源的高可用、负载均衡、数据切片的功能。
4.2 Amoeba不能做什么
既然知道Amoeba能为我们解决什么问题,也要做到Amoeba不擅长的事情。这样在具体项目技术方案选择时,方能权衡考虑。Amoeba对于以下几点暂时无能为力:
- 目前还不支持事务;
- 暂时不支持存储过程,官方说近期会支持;
- 不适合从Amoeba导数据的场景或者对大数据量查询的query并不合适,比如一次请求返回10w以上甚至更多数据的场合;
- 暂时不支持分库分表,amoeba目前只做到分数据库实例,每个被切分的节点需要保持库表结构一致。
若实际项目中所需要的功能正是Amoeba的短板,建议使用Mysql Proxy作为中间件,或者在应用层通过程序控制数据源,手动实现数据库读写分离。
5、部署MySQL主从复制并实现读写分离
环境描述:
| 主机 | 操作系统 | IP地址 | 主要软件 |
|---|---|---|---|
| Master | CentOS 6.5 x86_64 | 192.168.1.101 | cmake-2.8.6.tar.gzmysql-5.5.22.tar.gz |
| Slave1 | CentOS 6.5 x86_64 | 192.168.1.102 | cmake-2.8.6.tar.gzmysql-5.5.22.tar.gz |
| Slave2 | CentOS 6.5 x86_64 | 192.168.1.103 | cmake-2.8.6.tar.gzmysql-5.5.22.tar.gz |
| Amoeba | CentOS 6.5 x86_64 | 192.168.1.110 | amoeba-mysql-binary-2.2.0.tar.gzjdk-6u14-linux-x64.bin |
| 客户端 | CentOS 6.5 x86_64 | 192.168.1.111 |
5.1 部署MySQL主从复制
5.1.1 部署NTP时间同步环境
①安装,并配置NTP (在任意位置添加以下红色部分)
1 | [root@centos5 ~]# yum install -y ntp |
②启动服务,并添加防火墙规则
1 | [root@centos5 ~]# service ntpd restart |
5.1.2 安装MySQL数据库
(在Master、Slave1、Slave2上安装)
①同步时间
1 | [root@centos1 ~]# ntpdate 192.168.1.101 |
②编译安装MySQL
安装依赖包
1 | [root@centos1 ~]# yum -y install ncurses-devel |
编译安装cmake
1 | [root@centos1 ~]# tar xf cmake-2.8.6.tar.gz |
编译安装mysql
1 | [root@centos1 ~]# tar xf mysql-5.5.22.tar.gz |
②优化调整
1 | [root@centos1 mysql-5.5.22]# cp support-files/my-medium.cnf /etc/my.cnf |
③初始化数据库
1 | [root@centos1 mysql-5.5.22]# groupadd mysql |
④启动MySQL服务,创建数据库密码
1 | [root@centos1 mysql-5.5.22]# service mysqld start |
到此Master、Slave1、Slave2的MySQL数据库都已经安装完成
5.1.3 配置MySQL Master主服务器
①在/etc/my.cnf中修改和增加以下内容
1 | [root@centos1 ~]# vim /etc/my.cnf |
②重启MySQL服务
1 | [root@centos1 ~]# service mysqld restart |
③登录MySQL数据库,给从服务器授权
1 | [root@centos1 ~]# mysql -u root -p |
1 | mysql> grant replication slave on *.* to 'myslave'@'192.168.1.%' identified by '123456'; |
1 | mysql> flush privileges; |
1 | mysql> show master status; |
其中File列显示日志名,Position列显示偏移量,这两个值在后面配置从服务器的时候需要,Slave应从该点在Master上进行新的更新。
④关闭或添加防火墙规则
1 | [root@centos1 ~]# iptables -I INPUT -p tcp --dport 3306 -j ACCEPT |
5.1.4 配置MySQL Slave1、Slave2从服务器
①在/etc/my.cnf中修改和增加下面内容
1 | [root@centos2 ~]# vim /etc/my.cnf |
这里需要注意server-id不能与主服务器相同,另一个从服务器改为33
1 | [root@centos2 ~]# vim /etc/my.cnf |
②重启MySQL服务器
1 | [root@centos2 ~]# service mysqld restart |
③登录MySQL,配置同步
按主服务器结果更改下面命令中master_log_file和master_log_pos参数。
1 | [root@centos2 ~]# mysql -u root -p |
1 | mysql> change master to master_host='192.168.1.101',master_user='myslave',master_password='123456',master_log_file='master-bin.000001',master_log_pos=337; |
④启动同步
1 | mysql> start slave; |
⑤查看Slave状态,确保以下两个值为YES
*** 1. row ***
Slave_IO_State: Waiting for master to send event
Master_Host: 192.168.1.101
Master_User: myslave
Master_Port: 3306
Connect_Retry: 60
Master_Log_File: master-bin.000001
Read_Master_Log_Pos: 337
Relay_Log_File: relay-log-bin.000002
Relay_Log_Pos: 254
Relay_Master_Log_File: master-bin.000001
Slave_IO_Running: Yes
Slave_SQL_Running: Yes
Replicate_Do_DB:
Replicate_Ignore_DB:
Replicate_Do_Table:
Replicate_Ignore_Table:
Replicate_Wild_Do_Table:
Replicate_Wild_Ignore_Table:
Last_Errno: 0
Last_Error:
Skip_Counter: 0
Exec_Master_Log_Pos: 337
Relay_Log_Space: 408
Until_Condition: None
Until_Log_File:
Until_Log_Pos: 0
Master_SSL_Allowed: No
Master_SSL_CA_File:
Master_SSL_CA_Path:
Master_SSL_Cert:
Master_SSL_Cipher:
Master_SSL_Key:
Seconds_Behind_Master: 0
Master_SSL_Verify_Server_Cert: No
Last_IO_Errno: 0
Last_IO_Error:
Last_SQL_Errno: 0
Last_SQL_Error:
Replicate_Ignore_Server_Ids:
Master_Server_Id: 11
1 row in set (0.00 sec)ERROR:
No query specified
⑥关闭或添加防火墙规则
1 | [root@centos2 ~]# iptables -I INPUT -p tcp --dport 3306 -j ACCEPT |
5.1.5 验证主从复制效果
①在主、从服务器上登录MySQL
1 | [root@centos1 ~]# mysql -u root -p |
②在主服务器上新建数据库db_test
1 | mysql> create database db_test; |
③在主从,服务器上分别查看数据库,显示数据库相同,则主从复制成功
+——————–+
| Database |
+——————–+
| information_schema |
| db_test |
| mysql |
| performance_schema |
| test |
+——————–+
5 rows in set (0.00 sec)
5.2 部署MySQL读写分离
5.2.1 在主机Amoeba上安装Java环境
因为Amoeba是基于jdk1.5开发的,所以官方推荐使用jdk1.5或1.6版本,高版本不建议使用
1 | [root@centos4 ~]# cp /media/jdk-6u14-linux-x64.bin /usr/local/ |
5.2.2 安装并配置Amoeba软件
1 | [root@centos4 ~]# mkdir /usr/local/amoeba |
5.2.3 配置Amoeba读写分离,两个Slave读负载均衡
①Master、Slave1、Slave2中开放权限给Amoeba访问
1 | [root@centos1 ~]# mysql -u root -p |
1 | mysql> grant all on *.* to test@'192.168.1.%' identified by '123.com'; |
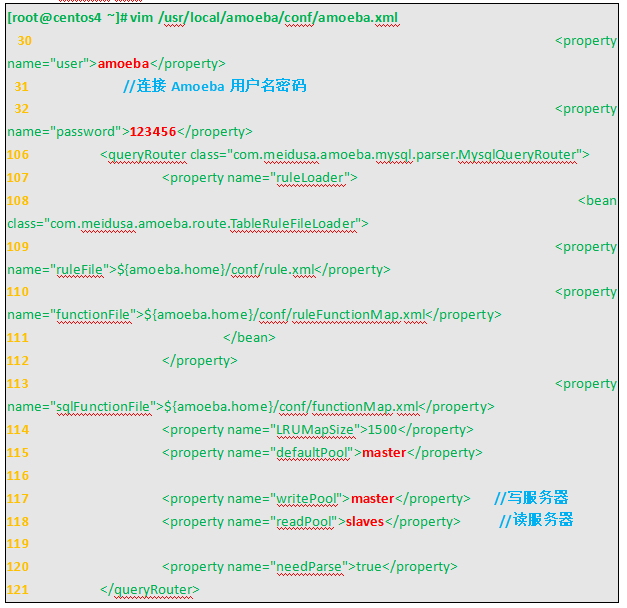
②编辑aomeba.xml配置文件
(修改以下红色内容,注意删除注释)
1 | [root@centos4 ~]# vim /usr/local/amoeba/conf/amoeba.xml |

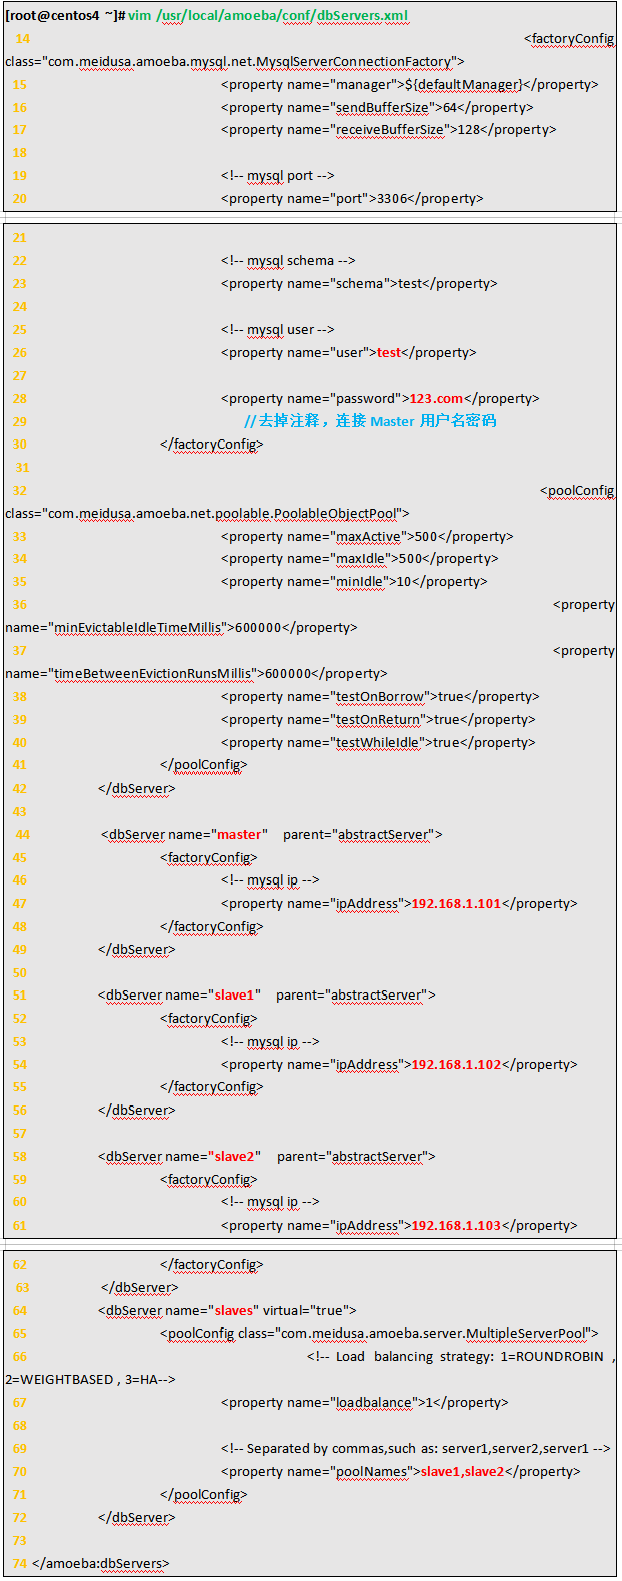
③编辑dbServer.xml配置文件
1 | [root@centos4 ~]# vim /usr/local/amoeba/conf/dbServers.xml |

④配置无误后,可以启动Amoeba,其默认端口为tcp 8066
1 | [root@centos4 ~]# /usr/local/amoeba/bin/amoeba start& |
⑤关闭或添加防火墙规则
1 | [root@centos4 ~]# iptables -I INPUT -p tcp --dport 8066 -j ACCEPT |
5.2.4 测试
①在Client主机上,通过代理访问MySQL
1 | [root@centos5 ~]# yum -y install mysql |
②在Master上创建一个表,同步到各从服务器上,然后关掉各从服务器的Slave功能,再插入区别语句。
1 | mysql> use db_test; |
分别在Slave1、Slave2两台从服务器上关闭slave
1 | mysql> stop slave; |
然后在Master主服务器上创建数据
1 | mysql> use db_test; |
③Slave1、Slave2从服务器上同步了表后,再手动插入其他内容
Slave1 上:
1 | mysql> use db_test; |
Slave2 上:
1 | mysql> use db_test; |
④测试读操作
第一次查询结果
1 | mysql> select * from zang; |
第二次查询结果
1 | mysql> select * from zang; |
第三次查询结果
1 | mysql> select * from zang; |
⑤测试写操作
在Client主机上插入一条语句
1 | mysql> insert into zang values (4); |
但在Client上查询不到,最终只有在Master上才能查看到这条语句内容,说明写操作在Master服务器上。
1 | mysql> select * from zang; |
由此验证,已经实现了MySQL读写分离,目前所有的写操作都全部在Master主服务器上,用来避免数据的不同步;所有的读操作都分摊给了Slave从服务器,用来分担数据库压力。