1、SELinux 简介
SELinux的全称是Security Enhanced Linux, 就是安全加强的Linux。在SELinux之前,root账号能够任意的访问所有文档和服务;如果某个文件设为777,那么任何用户都可以访问甚至删除;这种方式称为DAC(主动访问机制),很不安全。
DAC 自主访问控制: 用户根据自己的文件权限来决定对文件的操作,也就是依据文件的own,group,other/r,w,x权限进行限制。Root有最高权限无法限制。r,w,x权限划分太粗糙。无法针对不同的进程实现限制。
SELinux则是基于MAC(强制访问机制),简单的说,就是程序和访问对象上都有一个安全标签(即selinux上下文)进行区分,只有对应的标签才能允许访问。否则即使权限是777,也是不能访问的。
在SELinux中,访问控制属性叫做安全上下文。所有客体(文件、进程间通讯通道、套接字、网络主机等)和主体(进程)都有与其关联的安全上下文,一个安全上下文由三部分组成:用户(u)、角色(r)和类型(t)标识符。但我们最关注的是第三个部分
当程序访问资源时,主体程序必须要通过selinux策略内的规则放行后,就可以与目标资源进行安全上下文的比对,若比对失败则无法存取目标,若比对成功则可以开始存取目标,最终能否存取目标还要与文件系统的rwx权限的设定有关。所以启用了selinux后出现权限不符的情况时,你就得一步一步的分析可能的问题了。
以上简单了解即可,下面的是要重点掌握的
2、Selinux状态查看与配置
Selinux的配置文件位置:/etc/selinux/config,它还有个链接在/etc/sysconfig/selinux
2.1 配置selinux
使用config文件来配置selinux(通过配置文件修改selinux的状态属于永久修改,要重启系统才生效)

文件内容如下图:

SELINUX=enforcing
#此项定义selinux状态。
#enforcing—是强制模式系统受selinux保护。就是你违反了策略,你就无法继续操作下去
#permissive—是提示模式系统不会受到selinux保护,只是收到警告信息。permissive就是Selinux有效,但是即使你违反了策略的话它让你继续操作,但是把你的违反的内容记录下来(警告信息)
#disabled—禁用selinux。
SELINUXTYPE=targeted
#此项定义selinux使用哪个策略模块保护系统。targeted只对apache ,sendmail, bind,postgresql,nfs,cifs等网络服务保护。
以上策略配置都放置在/etc/selinux目录中,目录和策略名称相同
使用selinux相关命令查看和修改状态:(属于立即生效但临时性的)
①sestatus 查询selinux工作状态
1 | [root@localhost ~]# sestatus |
②selinuxenabled检查selinux是否开启,配合echo $?.传回值是0为开启,1为关闭
1 | [root@localhost ~]# selinuxenabled |
③getenforce查看selinux的状态
1 | [root@localhost ~]# getenforce |
④setenforce设定selinux运行状态,1开启(Enforcing),0关闭(Permissive)
1 | [root@localhost ~]# setenforce 1 |
2.2 查看及修改安全上下文
查看文件上下文可以通过ls -Z

查看进程上下文可以使用 ps Z

查看用户上下文可以用id –Z

安全上下文以用户:角色:类型(域)标识符的形式出现.(这里的用户指的是selinu用户)
以下是复制和移动文件时安全上下文的变化
①以httpd为例,这个httpd的进程可以访问/var/www/html下的文档对象,在/root目录下创建两个测试页文件(如test1.html、test2.html)
-rw-r–r–. root root unconfined_u:object_r:admin_home_t:s0 ./test1.html
-rw-r–r–. root root unconfined_u:object_r:admin_home_t:s0 ./test2.html
②复制test1.html文件到/var/www/html目录下,剪切test2.html文件到/var/www/html目录下
1 | [root@localhost ~]# cp test1.html /var/www/html/ |
③查看html目录下文件的安全上下文
-rw-r–r–. root root unconfined_u:object_r:httpd_sys_content_t:s0 test1.html
-rw-r–r–. root root unconfined_u:object_r:admin_home_t:s0 test2.html
④通过上图可以看到剪切操作时文件的上下文没有发生改变,仍然是原上下文,而复制操作时文件的上下文继承了目标目录的上下文。
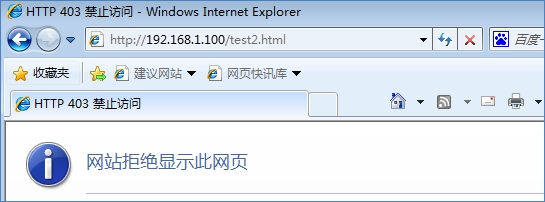
通过浏览器访问这两个网页文件

可以看到test1.html页面能访问而test2.html却被拒绝访问
⑤查看权限发现apache用户对这两个文件都具有r权限,但test2.html文件却拒绝访问。
total 8
-rw-r–r–. 1 root root 16 Nov 7 16:41 test1.html
-rw-r–r–. 1 root root 16 Nov 7 16:41 test2.html
原因就是因为httpd进程不能访问域类型标签是admin_home_t的资源,被selinux将访问拒绝了。
⑥查看日志/var/log/audit/audit.log通过日志记录也能看到test2.html文件拒绝httpd进程访问。
type=AVC msg=audit(1478508930.116:811): avc: denied { getattr } for pid=4649 comm=”httpd” path=”/var/www/html/test2.html” dev=”dm-0” ino=204341596
scontext=system_u:system_r:httpd_t:s0
tcontext=unconfined_u:object_r:admin_home_t:s0 tclass=file
⑦由于此文件记录的信息很多不宜直接查看,可以借助audit2why和audit2allow
1 | [root@localhost ~]# audit2why < /var/log/audit/audit.log |
注:提供audit2why和audit2allow工具软件包
1 | [root@localhost ~]# rpm -qf /bin/audit2why |
⑧收集Selinux产生的日志,另一个工具是setroubleshoot,对应的软件包为
1 | [root@localhost ~]# rpm -qf /sbin/setroubleshootd |
Setroubleshoot将错误信息写入/var/log/messages中
Nov 7 16:55:30 localhost setroubleshoot: SELinux is preventing /usr/sbin/httpd from getattr access on the file /var/www/html/test2.html. For complete SELinux messages. run sealert -l 8267a718-88e1-4802-bc41-b3bb7200d5b3
上面的错误信息大概说的是”selinux阻止httpd访问这个文件,要查看完整的信息,请执行sealert命令”
1 | [root@localhost ~]# sealert -l 8267a718-88e1-4802-bc41-b3bb7200d5b3 |
可以用sesearch [–allow] [-s 主体类别] [-t 目标类别] [-b]查询详细规则 sesearch命令由下列软件包提供
1 | [root@localhost ~]# rpm -qf /bin/sesearch |
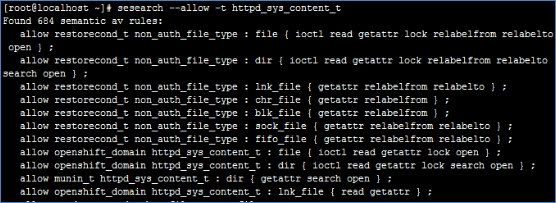
找出目标资源类别为httpd_sys_content_t的相关信息
1 | [root@localhost ~]# sesearch --allow -t httpd_sys_content_t |

从上图显示信息表示[allow 主体程序安全上下文类别 目标资源安全上下文类别],说明这个资源类别可以被哪个主体程序类别所读取。
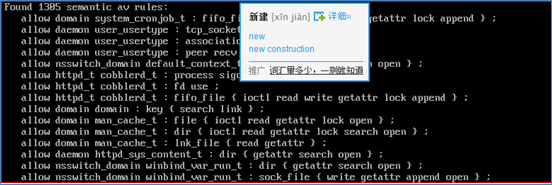
找出主体程序为httpd_t相关的所有信息
1 | [root@localhost ~]# sesearch -s httpd_t --allow |

从上面的数据就可以看出程序httpd_t为个类别可以访问的哪些资源类别。
如何解决上述问题呢?
解决方法就是更改test2.html文件的上下文。有两种方式,一种是通过restorerecon( restore context) 修复继承当前目录默认的上下文;一种是通过chcon (change context) 修改当前的上下文。
a.)使用restorerecon( restore context) 修复继承当前目录默认的上下文
分两步实现:
首先为 /var/www/html 这个目录下的所有文件添加默认标签类型:
semanagefcontext -a -t httpd_sys_content_t ‘/var/www/html(/.*)?’
因为html目录的默认标签类型就是httpd_sys_content_t,所以此步可以省略
然后用新的标签类型标注已有文件:
a.)restorecon -Rv /var/www/html/, 之后httpd就可以访问该目录下的文件了。
2
3
restorecon reset /var/www/html/test2.html context unconfined_u:object_r:admin_home_t:s0->unconfined_u:object_r:httpd_sys_content_t:s0
[root@localhost ~]# ll -lZ /var/www/html/-rw-r–r–. root root unconfined_u:object_r:httpd_sys_content_t:s0 test1.html
-rw-r–r–. root root unconfined_u:object_r:httpd_sys_content_t:s0 test2.html
semanage和restorecon命令是由下列软件包提供的
1 | [root@localhost ~]# rpm -qf /sbin/semanage |
b.)使用chcon (change context) 修改当前的上下文
2
[root@localhost ~]# ls -lZ /var/www/html/-rw-r–r–. root root unconfined_u:object_r:httpd_sys_content_t:s0 test1.html
-rw-r–r–. root root unconfined_u:object_r:httpd_sys_content_t:s0 test2.html
注:
chcon意思是change context
-t type 类型
-R recursive 递归(特别适用于改变某个目录下所有文件的context)
-u user
-r role
或
2
[root@localhost ~]# ls -lZ /var/www/html/-rw-r–r–. root root unconfined_u:object_r:httpd_sys_content_t:s0 test1.html
-rw-r–r–. root root unconfined_u:object_r:httpd_sys_content_t:s0 test2.html
–reference表示用test1.html文件的上下文修改test2.html文件的上下文。
3、SELinux的布尔值
这个布尔值类似一个开关,打开的话,他对应的一些服务就允许执行,否则的话就拒绝执行。
看看有哪些布尔值
1 | [root@localhost ~]# getsebool -a |
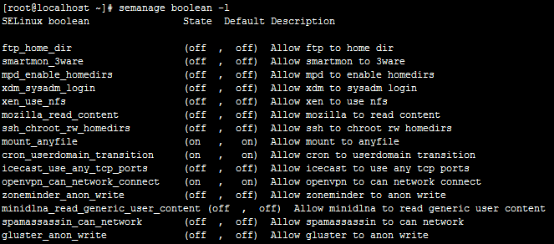
也可用semanage命令(看得更详细一点)
1 | [root@localhost ~]# semanage boolean -l |
知道了布尔值的名字,可以通过sesearch 来确认他关联了哪些服务的域,比如httpd_enable_homedir允许下列规则,如果设置为off的话,那么他们都是无法访问的。

设置boolean值,-P为设置永久生效.
1 | [root@localhost ~]# setsebool [-P] 布尔值 on/off |
3.1 下面看一个与布尔值有关的例子
3.1.1 确认已经启用了 Selinux、启动 FTP
1 | [root@localhost ~]# getenforce |
3.1.2 在匿名访问目录下创建 2 个文件进行测试
一个是在该目录下手动创建,这样该文件会自动继承/var/ftp/pub 下的目录上下文的值,一个用 mv 命令从 root 目录下移动过来,这样的文件会保留 root 目录下的安全上下文,如下
2
3
[root@localhost ~]# mv test2.txt /var/ftp/
[root@localhost ~]# ll -lZ /var/ftp/drwxr-xr-x. root root system_u:object_r:public_content_t:s0 pub
-rw-r–r–. root root unconfined_u:object_r:public_content_t:s0 test1.txt
-rw-r–r–. root root unconfined_u:object_r:admin_home_t:s0 test2.txt
3.1.3 使用匿名登录测试
Trying ::1…
Connected to localhost (::1).
220 (vsFTPd 3.0.2)
Name (localhost:root): ftp
331 Please specify the password.
Password:
230 Login successful.
Remote system type is UNIX.
Using binary mode to transfer files.
ftp> cd pub
250 Directory successfully changed.
ftp> ls
229 Entering Extended Passive Mode (|||7645|).
150 Here comes the directory listing.
-rw-r–r– 1 0 0 6 Nov 07 09:50 test1.txt
226 Directory send OK.
ftp>
发现这里看不到 test2.txt 文件
已知系统启动了 Selinux,先查看系统日志,有两个工具可以收集到 Selinux 产生的
日志,一个是 setroubleshoot,一个是 audit,先使用 audit 工具,使用方法
如下:
系统中提供了 audit 相关的命令,常用的有 audit2why 和 audit2allow,audit 产生的日志
放在/var/log/audit, 由于此文件记录的信息很多不宜直接查看,可以借助 audit2why
命令,首先启动 audit
3.1.4 在客户端登录 FTP 服务器时会出发 audit deamon 产生日志
type=AVC msg=audit(1478511697.588:987): avc: denied { getattr } for pid=6901 comm=”vsftpd” path=”/test2.txt” dev=”dm-0” ino=204352546 scontext=system_u:system_r:ftpd_t:s0-s0:c0.c1023 tcontext=unconfined_u:object_r:admin_home_t:s0 tclass=file
Was caused by:
The boolean ftpd_full_access was set incorrectly.
Description:
Allow ftpd to full access

Allow access by executing:
# setsebool -P ftpd_full_access 1
查看最底部的信息,AVC 是 access vector cache 的缩写, 目的是记录所有与 SELinux 有关的存取统计资料。
3.1.5 根据日志中的建使用 audit2allow 命令查看给出的建议如下
1 | [root@localhost ~]# audit2allow < /var/log/audit/audit.log |
验证布尔值中有关 FTP 的定义
ftp_home_dir –> off
ftpd_anon_write –> off
ftpd_connect_all_unreserved –> off
ftpd_connect_db –> off
ftpd_full_access –> off
ftpd_use_cifs –> off
ftpd_use_fusefs –> off
……………………………………………………
发现ftp_home_dir –> off,文件 root.txt 的类型刚好是 root:object_r:user_home_t:s0
3.1.6 所以更改此 bool 值就可以
2
[root@localhost ~]# getsebool -a | grep ftpftp_home_dir –> on
ftpd_anon_write –> off
ftpd_connect_all_unreserved –> off
ftpd_connect_db –> off
ftpd_full_access –> off
ftpd_use_cifs –> off
ftpd_use_fusefs –> off
………………………………………………
(-P 是把该修改写到文件,下次启动仍然有效)
客户端登录测试,发现 root.txt 文件就可以访问了
3.1.7 再次访问ftp
1 | [root@localhost ~]# ftp localhost |
总结一下:如果搭配了某个服务器,然后客户端无法正常访问,应该按照下面的顺序进行排错:
- 该服务的配置文件中是否开启了相关的权限 ,比如是否允许匿名用户写入等等;
- 文件系统的权限,比如是否需要使用chmod修改权限
- SELinux的上下文和布尔值