1、ISCSI 简介
iscsi实现网络存储,提供存储端叫 target,使用存储端叫 initiator。target 上可以提供存储空间,initiator负责连接ISCSI设备,在ISCSI设备中创建文件系统,以及存取数据,在 initiator 上看上去是多了一块硬盘。
服务器端配置target,准备做为LUN发布的ISCSI的存储设备(可以是一整块磁盘、一个分区、逻辑卷或RAID阵列)。
2、ISCSI 服务部署
2.1 准备
事先准备好逻辑卷作为ISCSI的存储设备。
1 | [root@centos7-1 ~]# pvcreate /dev/sd[bc] |
ACTIVE ‘/dev/centos/swap’ [2.00 GiB] inherit
ACTIVE ‘/dev/centos/home’ [47.45 GiB] inherit
ACTIVE ‘/dev/centos/root’ [50.00 GiB] inherit
ACTIVE ‘/dev/vg00/lv00’ [5.00 GiB] inherit
2.2 ISCSI 服务端部署
2.2.1 安装target服务端
targetcli 管理工具
1 | [root@centos7-1 ~]# yum install -y targetd targetcli |
2.2.2 启动服务
1 | [root@centos7-1 ~]# systemctl enable target |
2.2.3 配置防火墙
1 | [root@centos7-1 ~]# firewall-cmd --permanent --add-port=3260/tcp |
2.2.4 执行 targetcli 管理工具

注:输入help可以查看targetcli的帮助

基本思路:
先把准备共享的块做出来,
创建一个target,
在target上创建lun,
一个lun连接一个块
2.3 target 端配置
2.3.1 创建块
即给要发布的逻辑卷起个名字

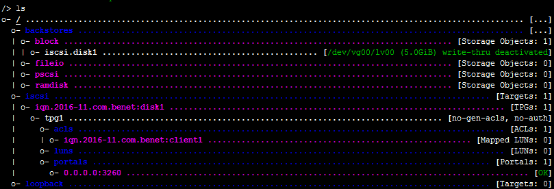
注:给/dev/vg00/lv00逻辑卷起个名字叫iscsi.disk1查看块如下图所示:

2.3.2 创建 iqn 名字即创建ISCSI对象

查看ISCSI对象如下图所示:

2.3.3 设置ACL
即将ISCSI对象与客户端IP或主机名绑定

注意:iqn.2015-06.com.benet:client1是 initiator 的名字,需要在客户端中设置的。

2.3.4 创建LUN(逻辑存储单元)并绑定块

一个ISCSI对象可以创建多个LUN(LUN0、LUN1……)。
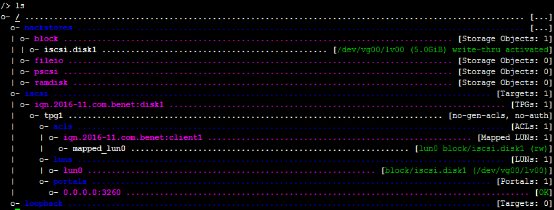
执行ls查看

2.3.5 启动监听程序
先删除原先有的再创建

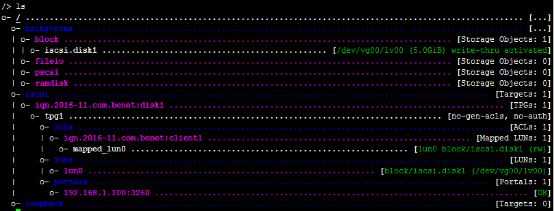
注:172.24.3.5是ISCSI服务端网卡IP

2.3.6 查看监听端口
配置完成后,exit退出;查看监听端口现已监听
1 | [root@centos7-1 ~]# ss -anpt | grep 3260 |
2.3.7 查看saveconfig.json配置
可以查看/etc/target/saveconfig.json配置文件,该配置文件保存着ISCSI的配置。
1 | [root@centos7-1 ~]# cat /etc/target/saveconfig.json |
2.4 initiator端的配置
2.4.1 安装软件
1 | [root@centos7-2 ~]# yum install -y iscsi-initiator-utils |
2.4.2 给 initiator 起个名字
1 | [root@centos7-2 ~]# vim /etc/iscsi/initiatorname.iscsi |
2.4.3 启动服务
1 | [root@centos7-2 ~]# systemctl enable iscsi |
2.4.4 发现存储
1 | [root@centos7-2 ~]# iscsiadm -m discovery -t st -p 192.168.1.100 |
2.4.5 登录存储
1 | [root@centos7-2 ~]# iscsiadm -m node -T iqn.2016-11.com.benet:disk1 -p 192.168.1.100 -l |
注:-l表示连接ISCSI目标;-u表示断开和ISCSI目标的连接
2.4.6 验证客户端ISCSI连接
1 | [root@centos7-2 ~]# lsscsi |
查看已经挂载为本地/dev/sdb
2.4.7 剩下来的操作就和管理本地磁盘一样了
对磁盘分区
1 | Device Boot Start End Blocks Id System |
格式化为文件系统
1 | [root@centos7-2 ~]# mkfs.xfs /dev/sdb1 |
使用UUID挂载
1 | [root@centos7-2 ~]# blkid /dev/sdb1 |
Filesystem 1K-blocks Used Available Use% Mounted on
/dev/mapper/centos-root 52403200 3547736 48855464 7% /
devtmpfs 922748 0 922748 0% /dev
tmpfs 938312 144 938168 1% /dev/shm
tmpfs 938312 9208 929104 1% /run
tmpfs 938312 0 938312 0% /sys/fs/cgroup
/dev/mapper/centos-home 49725724 32988 49692736 1% /home
/dev/sda1 508588 160896 347692 32% /boot
tmpfs 187664 8 187656 1% /run/user/42
tmpfs 187664 20 187644 1% /run/user/0
/dev/sr0 4227724 4227724 0 100% /run/media/root/CentOS 7 x86_64
/dev/sdb1 5228544 32928 5195616 1% /data
2.4.8 重启initiator端系统
以上都作完了,就可以重启initiator端系统,查看是否会随着开机自动挂载
1 | [root@centos7-2 ~]# df |
Filesystem 1K-blocks Used Available Use% Mounted on
/dev/mapper/centos-root 52403200 3546412 48856788 7% /
devtmpfs 922748 0 922748 0% /dev
tmpfs 938312 84 938228 1% /dev/shm
tmpfs 938312 9144 929168 1% /run
tmpfs 938312 0 938312 0% /sys/fs/cgroup
/dev/mapper/centos-home 49725724 32988 49692736 1% /home
/dev/sda1 508588 175860 332728 35% /boot
/dev/sdb1 5228544 32928 5195616 1% /data
tmpfs 187664 12 187652 1% /run/user/42
tmpfs 187664 0 187664 0% /run/user/0