1、Nagios简介
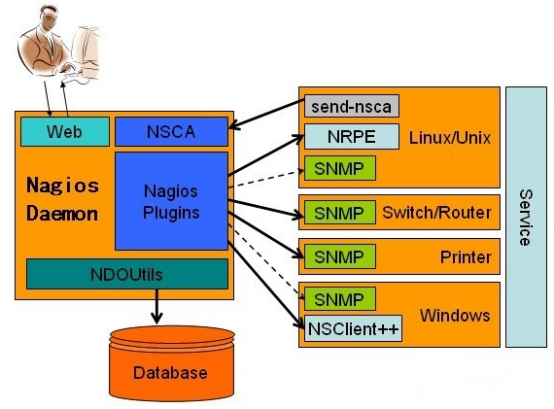
Nagios是一款开源免费的网路监视工具,可以监控的设备:Windows,Linux,Unix,Router,Switch,具有报警功能,是一个网络监控系统。它可以监视你指定的主机和服务,并在那些设备“变坏”和“变好”的时候通知管理员。
在系统或服务状态异常时发出邮件或短信报警第一时间通知网站运维人员,在状态恢复后发出正常的邮件或短信通知。Nagios Core 原先设计在Linux下运行,当然,它在其他的Unix系统下应该也能进行工作。
Nagios Ain’t Gonna Insist On Sainthood” Sainthood 翻译为圣徒
官方网站:http://www.nagios.org
Nagios运行模式和优点

A.运行模式:数据收集是C/S模式,用户查看监控信息是B/S模式
B.优点:
- 监控网络服务(SMTP、POP3、HTTP、PING等);
- 监控主机资源(处理器负荷、磁盘利用率等);
- 简单地插件设计使得用户可以方便地扩展自己服务的检测方法;
- 当服务或主机问题产生与解决时将告警发送给联系人(通过EMail、短信、用户定义方式);
- 可以定义一些处理程序,使之能够在服务或者主机发生故障时起到预防作用;
- 自动的日志滚动功能;
- 可选的WEB界面用于查看当前的网络状态、通知和故障历史、日志文件等;
Nagios工作原理

1)Nagios插件:
nagios-plugins是nagios官方提供的一套插件程序,nagios监控主机的功能其实都是通过执行插件程序来实现的。
nagios本身并没有监控的功能,所有的监控是由插件完成的,插件将监控的结果返回给nagios,nagios分析这些结果以web的方式展现给我们,同时提供相应的报警功能(这个报警的功能也是由插件完成的)。
所有的这些插件是一些实现特定功能的可执行程序,默认安装的路径是/usr/local/nagios/libexec,可以自己查看。
使用NRPE监控LINUX上的”本地信息”
对系统为linux的主机进行如下监控:CPU负载、磁盘容量、登陆用户数、总进程数、僵尸进程数、swap分区使用情况。
对于像磁盘容量,cpu负载这样的”本地信息”,nagios只能监测自己所在的主机,而对其他的机器则显得有点无能为力。毕竟没得到被控主机的适当权限是不可能得到这些信息的。为了解决这个问题,nagios有这样一个附加组件—-NRPE。用它就可以完成对linux类型主机”本地信息”的监控。
2)NRPE总共由两部分组成:
- check_nrpe 插件,位于在监控主机上
- NRPE daemon,运行在远程的linux主机上(通常就是被监控机)
3)Nagios通过nrpe插件来远程管理服务
- Nagios会运行check_nrpe这个插件,告诉它要检查什么。
- 通过SSL方式,check_nrpe插件会连接到远程的NRPE daemon。
- NRPE运行本地的各种插件去检测本地的服务和状态(chenk_disk,..etc)。
- NRPE将检查的结果返回给check_nrpe插件,插件再把结果送到Nagios状态队列。
- Nagios依次读取队列中的信息,再把结果显示出来。
注意:NRPE daemon需要nagios插件安装在远程的linux主机上,否则,daemon不能做任何的监控。
4)通过NRPE的检测分为两种
直接检测:检测的对象是运行NRPE的那台linux主机的本地资源。
被监控机上安装有nrpe,并且还有插件,最终的监控是由这些插件来进行的.当监控主机将监控请求发给nrpe后,nrpe调用插件来完成监控。
间接检测:当运行nagios的监控主机无法访问到某台被监控机,但是运行NRPE的机器可以访问到时,NRPE就可以充当一个代理,将监控请求发送到被监控机(必须要说明的是,通常被监控机与监控机在同一网络内,所以这样的情况很少)
5)nagios可以做到
- 数据报警(报警功能恒强悍)[故障出发,故障恢复都可以]。
- 依赖分析报警(发现关键设备故障,相连的设备就不报警)。
- 数据采集(采集的数据比较独特,他只关心警戒位,只关心正常与否的状态,状态转换时可以实现报警,所以它采集的数据不需要保存),当然也有插件弥补这个不足,如PNP4Nagios。
6)Nagios所需要的软件
LAMP环境,不需要mysql
| 组件 | 描述 |
|---|---|
| nagios-3.5.1.tar.gz | Nagios核心文件,Nagios服务文件,不建议用最新,很多插件没做好 |
| nagios-plugins-2.1.1.tar.gz | Nagios 插件,用于存放和收集脚本和命令 |
| NSCP-0.5.0 | 也就是Nsclient++,用来监控Windows,分为64位和32位版本 |
| nrpe-2.15.tar.gz | 代理服务,用于监控非Nagios服务器的服务器本地私有信息代理 |
| vautour_style.zip | 举例主题包 |
2、部署Nagios监控服务
2.1 创建Nagios运行用户和用户组
1 | [root@centos1 ~]# useradd -s /sbin/nologin nagios |
2.2 编译安装Nagios
1 | [root@centos1 ~]# tar zxf nagios-4.0.1.tar.gz |
2.33 验证安装是否成功
需要查看/usr/local/nagios目录是否有如下内容:
1 | [root@centos1 nagios-4.0.1]# ls /usr/local/nagios/ |
2.4 安装Nagios插件
Nagios提供的各种监控功能基本上是通过插件来完成的。
下载地址:https://www.nagios-plugins.org/download/nagios-plugins-1.5.tar.gz
1 | [root@centos1 ~]# tar zxf nagios-plugins-1.5.tar.gz |
2.5 安装NRRE
如果要获取远程主机上的本地资源或属性,如CPU利用率、磁盘利用率等,需要借助外部构件NRRE来完成。
下载地址:https://www.nagios-plugins.org/download/nagios-plugins-1.5.tar.gz
监控端与被监控主机之间使用SSL安全通道,需要首先安装openssl-devel
1 | [root@centos1 ~]# yum -y install openssl-devel |
2.6 安装与配置Apache和PHP
Apache和PHP不是安装Nagios所必需的,但是Nagios提供了Web监控界面,通过Web监控界面可以清晰地看到被监控主机、资源的运行状态,因此,安装一个Web服务是很有必要的。
需要注意的是,Nagios在Nagios3.1.x版本以后,配置Web监控界面时需要PHP支持。
1 | [root@centos1 ~]# yum -y instll httpd |
为了安全起见,一般情况下要让Nagios的Web监控页面必须经过授权才能访问,这需要增加验证配置,即在/etc/httpd/conf.d/nagios.conf 配置文件的最后添加如下信息,因为前面安装Nagios时添加了make install-webconf所以以下配置都已经生成好了。
1 | [root@centos1 ~]# cat /etc/httpd/conf.d/nagios.conf |
2.7 生成nagios网页用户名和密码
1 | [root@centos1 ~]# htpasswd -c /usr/local/nagios/etc/htpasswd.users nagiosadm |
2.8 查看认证文件内容,并启动Web服务
1 | [root@centos1 ~]# cat /usr/local/nagios/etc/htpasswd.users |
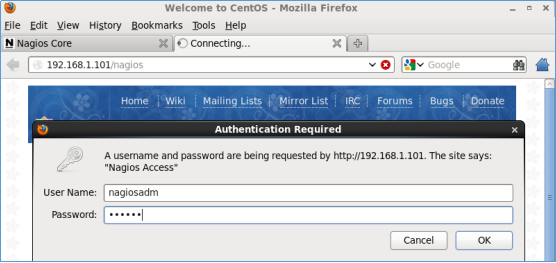
2.9 到此就可以访问监控网页了
(别忘了做防火墙入站规则,访问登录页面后输入刚刚创建的登录用户,密码)
1 | [root@centos1 etc]# iptables -I INPUT -p tcp --dport 80 -j ACCEPT |

3、配置Nagios监控系统
3.1 默认配置文件介绍
接下来配置Nagios,在配置之前我们要了解Nagios配置文件的作用及目录层次结构,Nagios安装完毕之后,默认的配置文件在/usr/local/nagios/etc/目录下
1 | [root@centos1 ~]# cd /usr/local/nagios/etc/ |
3.2 配置文件之间的关系
在Nagios的配置过程中涉及的几个定义有主机、主机组、服务、服务组、联系人、联系人组、监控时间和监控命令等。从这些定义可以看出,Nagios各个配置文件之间是互为关联、彼此引用的。成功配置出一台Nagios监控系统,必须要弄清楚每个配置文件之间依赖与被依赖的关系,最重要的有四点。
- 定义监控哪些主机、主机组、服务和服务组
- 定义这个监控要用什么命令实现
- 定义监控的时间段
- 定义主机或服务出现问题时要通知的联系人和联系人组
3.3 配置Nagios
为了能更清楚地说明问题,同时也为了维护方便,建议将Nagios各个定义对象创建独立的配置文件
- 创建conf目录来定义host主机
- 创建hostgroups.cfg文件来定义主机组
- 用默认的contacts.cfg文件来定义联系人和联系人组
- 用默认的commands.cfg文件来定义命令
- 用默认的timeperiods.cfg来定义监控时间段
- 用默认的templates.cfg文件作为资源引用文件
初步了解Nagios的配置文件后,接下来开始修改配置文件
①编辑主配置文件 (添加红色内容,为需要调用的配置文件)
注:前面数字为行号
1 | [root@centos1 etc]# vim /usr/local/nagios/etc/nagios.cfg |
29 cfg_file=/usr/local/nagios/etc/objects/commands.cfg
30 cfg_file=/usr/local/nagios/etc/objects/contacts.cfg
31 cfg_file=/usr/local/nagios/etc/objects/timeperiods.cfg
32 cfg_file=/usr/local/nagios/etc/objects/templates.cfg
33 cfg_file=/usr/local/nagios/etc/objects/hostgroups.cfg
34 cfg_dir=/usr/local/nagios/etc/conf //为了把主机配置信息都放置在此文件夹下方便管理,如果想把某个目录下的所有文件都包含进来,中以使用cfg_dir
[root@centos1 etc]# mkdir /usr/local/nagios/etc/conf
②定义一个check_nrpe监控命令(添加以下红色内容)
注:前面数字为行号
1 | [root@centos1 etc]# vim /usr/local/nagios/etc/objects/commands.cfg |
225 #for chen //添加一个注释名称,以防以后忘记改了哪里
226 define command{
227 command_name check_nrpe
228 command_line $USER1$/check_nrpe -H $HOSTADDRESS$ -c $ARG1$
229 }
230
231 ###############################################################################
232
233 # ‘process-host-perfdata’ command definition
234 define command{
235 command_name process-host-perfdata
236 command_line /usr/bin/printf “%b” “$LASTHOSTCHECK$\t$HOSTNAME$\t$HOSTSTATE$\t$HOSTATTEMPT$\t$HOSTSTATETYPE$\t $HOSTEXECUTIONTIME$\t$HOSTOUTPUT$\t$HOSTPERFDATA$\n” >> /usr/local/nagios/var/host-perfdata.out
237 }
③定义监控服务联系人(添加以下内容)
1 | [root@centos1 etc]# vim /usr/local/nagios/etc/objects/contacts.cfg |
注:以上配置中各参数解释如下
| 配置 | 参数 | 描述 |
|---|---|---|
| contact_name | ywgcsz | 定义联系人名称 |
| alias | ywgcsz | 别名 |
| service_notification_period | 24x7 | 监控主机服务7x24小时 |
| host_notification_period | 24x7 | 监控主机对角色应用服务7x24小时 |
| service_notification_options | w,u,c,r | 告警级别参数 |
| host_notification_options | d,u,r | 定义主机在什么状态下需要发送通知给使用者,d:down,表示宕机状态;u:unreachable,不可到达状态;r:recovery,表示重新恢复状态 |
| service_notification_commands | notify-service-by-email | 调用邮件名称 |
| host_notification_commands | notify-host-by-email | 调用飞信名称 |
| root@centos1.benet.com | 定义用于接收的电子邮箱 | |
| pager | 13488886666,13466668888 | 定义飞信接收手机 |
④定义主机组(文件需手动创建)
1 | [root@centos1 etc]# vim /usr/local/nagios/etc/objects/hostgroups.cfg |
⑤相应的配置文件已经修改完毕,下面开始具体监控MySQl、HTTP主机的存活,负载、进程
1 | [root@centos1 etc]# vim /usr/local/nagios/etc/conf/192.168.1.102.cfg |
⑥修改/usr/local/nagios/etc/cgi.cfg
将use_authentication=1修改为0即可
1 | [root@centos1 etc]# vim /usr/local/nagios/etc/cgi.cfg |
⑦到此需要对nagios作语法检测(如有错,会提示相应的文件、相应的行),确认无误后启动Nagios服务
1 | [root@centos1 etc]# /usr/local/nagios/bin/nagios -v /usr/local/nagios/etc/nagios.cfg |
1 | [root@centos1 ~]# service nagios start |
4、配置Nagios被监控端
到此我们需要回到被监控的服务器上安装Nagios插件
①安装所需依赖包并创建运行用户
1 | [root@centos2 ~]# yum -y install openssl openssl-devel |
②编译安装nagios-plugins
1 | [root@centos2 ~]# tar zxf nagios-plugins-1.5.tar.gz |
③编译安装nrpe
1 | [root@centos2 ~]# tar zxf nrpe-2.15.tar.gz |
④添加监控服务器的IP地址
1 | [root@centos2 nrpe-2.15]# vim /usr/local/nagios/etc/nrpe.cfg |
⑤启动nrpe服务
1 | [root@centos2 nrpe-2.15]# /usr/local/nagios/bin/nrpe -c /usr/local/nagios/etc/nrpe.cfg –d |
注:如果想重启,只有杀掉进程后再次启动
⑥添加防火墙策略
1 | [root@centos2 nrpe-2.15]# iptables -I INPUT -p tcp --dport 5666 -j ACCEP |
⑧在监控服务器上测试NRPE运行是否正常
1 | [root@centos1 etc]# /usr/local/nagios/libexec/check_nrpe -H 192.168.1.102 |
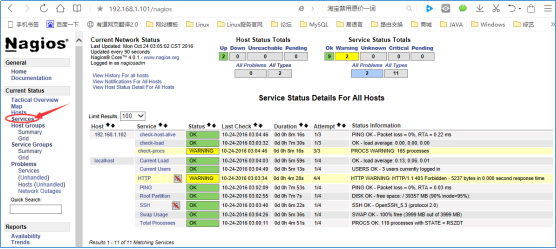
⑨查看服务器的监控情况
