Cacti 监控系统

1、Cacti简介

  1. cacti是用php语言实现的一个软件,它的主要功能是用snmp服务获取数据,然后用rrdtool储存和更新数据,当用户需要查看数据的时候用rrdtool生成图表呈现给用户。因此,snmp和rrdtool是cacti的关键。Snmp关系着数据的收集,rrdtool关系着数据存储和图表的生成。

  2. Mysql配合PHP程序存储一些变量数据并对变量数据进行调用,如:主机名、主机ip、snmp团体名、端口号、模板信息等变量

  3. snmp抓到数据不是存储在mysql中,而是存在rrdtool生成的rrd文件中(在cacti根目录的rra文件夹 下)。rrdtool对数据的更新和存储就是对rrd文件的处理,rrd文件是大小固定的档案文件(RoundRobinArchive),它能够存储的数据笔数在创建时就已经定义。

2、Cacti 工作原理

Cacti操作可以分为以下三部分,如图所示:
img

2.1 Data Retrieval

Cacti首先要做的工作就是收集数据,cacti使用Poller(轮询器)收集数据。Poller是操作系统scheduler的扩展,如在类Unix系统中的crontab。现在的IT设施中会有许多不同的设备,如服务器、网络设备等,cacti主要使用SNMP协议来从远端的设备上收集数据,所有可以使用SNMP协议的设备都可以被cacti监控。

2.2 Data Storage

存储收集到的数据有许多方法,可以使用数据库、平面文件等,cacti使用的是RDDTool。RRD是RoundRobin Database(环形数据库)的缩写,RRD用来存储和显示时间序列数据,如网络带宽、机房温度、服务器负载等,RRD使用非常紧凑的方式存储数据,数据不会随着时间的推移而增大,RRD还可以生成美观的图形。这些特性使得cacti没有存储需求。RRD也做一席位其他的工作,如RRD会将原始数据与已整合的数据进行合并,以使得历史数据的存储节省空间,RRD支持的整合功能包括:AVERAGE,MAXIMUM, MINIMUM和LAST。

2.3 Data Presentation

Cacti最大的一个特点是内置了RRDTool画图功能,将其与通用的web服务器相结合,可以实现在任意平台上使用浏览器就可以查看监控画面。

3、Cacti的工作结构

C/S模式,采集监测数据
B/S模式,管理监测平台
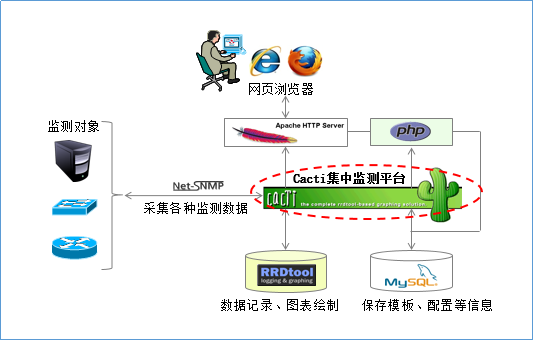
image-20191120111605813

4、部署Cacti监控web和MySQL

4.1 安装Net-SNMP、RRDTool等支持软件

①构建数据库级Web平台(以使用CentOS 6.5系统光盘中的rpm包构建LAMP环境为例,所需安装的主要软件包如下所示,若还提示缺少其他依赖包,请根据提示从光盘中安装相应的软件包即可。)

1
2
3
4
5
6
7
8
9
10
11
[root@centos1 ~]# yum -y install httpd
[root@centos1 ~]# yum -y install mysql mysql-server mysql-devel
[root@centos1 ~]# yum -y install zlib freetype libjpeg fontconfig gd libxml2 php-gd
[root@centos1 ~]# yum -y install php php-mysql
[root@centos1 ~]# service httpd start
[root@centos1 ~]# service mysqld start
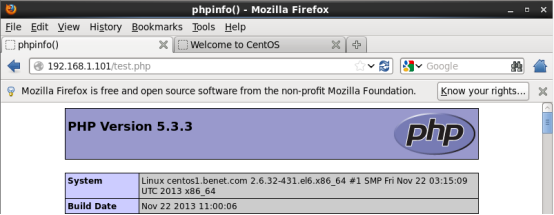
//安装完成以后,配置并启动mysql、httpd服务,确保LAMP协作平台工作正常,可以写一个php测试页。
[root@centos1 ~]# echo "<?php
> phpinfo();
> ?>" > /var/www/html/test.php
[root@centos1 ~]#

image-20191120111720389

②安装net-snmp-utils软件包(Cacti平台通过SNMP协议采集监测数据,这些工具程序由net-snmp-utils软件包提供,所需安装的软件包及依赖包如下所述。)

1
2
3
[root@centos1 ~]# yum -y install net-snmp net-snmp-utils
[root@centos1 ~]# service snmpd start
[root@centos1 ~]# chkconfig snmpd on

③安装rrdtool软件包
下载rrdtool-1.4.8.tar.gz软件包至目录/root
通过yum确认并安装相关的软件包

1
[root@centos1 ~]# yum -y install cairo-devel zlib libxml2 libxml2-devel glib2 glib2-devel libpng libpng-devel freetype freetype-devel libart_lgpl pango pango-devel perl perl-devel perl-CPAN

4.2 部署Cacti、设置数据库连接

①部署Cacti源码包(将下载的Cacti源码包解压到Web服务器的网页目录。)

1
2
3
4
5
[root@centos1 ~]# tar zxvf cacti-0.8.8b.tar.gz
[root@centos1 ~]# mv cacti-0.8.8b/ /var/www/html/cacti
//添加一个用来读写监测数据的用户账号(如Cacti),并设置目录的属主,以便正常读取及写入数据
[root@centos1 ~]# useradd cacti
[root@centos1 ~]# chown -R cacti:cacti /var/www/html/cacti/

②建立数据库、表结构
先创建用于Cacti监测平台的数据库,并授权一个数据库用户(如Cacti),然后使用Cacti源码目录下的Cacti.sql脚本,导入预设的各种数据表。

1
2
3
4
5
6
7
8
9
10
11
12
13
14
15
16
17
18
19
20
21
22
23
24
25
26
27
28
29
30
[root@centos1 ~]# mysql -u root –p               //(这里因为是刚安装数据库还没设置密码、直接回车即可进入,在实际生产环境中建议设置高强度的mysql密码)
Enter password:
Welcome to the MySQL monitor. Commands end with ; or \g.
Your MySQL connection id is 2
Server version: 5.1.71 Source distribution

Copyright (c) 2000, 2013, Oracle and/or its affiliates. All rights reserved.

Oracle is a registered trademark of Oracle Corporation and/or its
affiliates. Other names may be trademarks of their respective
owners.

Type 'help;' or '\h' for help. Type '\c' to clear the current input statement.

mysql> create database cacti default character set utf8; //修改默认的字符集编码为utf8
Query OK, 1 row affected (0.00 sec)

mysql> show databases;
+--------------------+
| Database |
+--------------------+
| information_schema |
| cacti |
| mysql |
| test |
+--------------------+
4 rows in set (0.00 sec)

mysql> grant all on cacti.* to 'cacti'@'localhost' identified by 'cacti'; //设置允许访问cacti库的用户密码为cacti
Query OK, 0 rows affected (0.00 sec)

③调整Cacti配置文件
Cacti的配置文件位于源码目录中的include/文件夹下,名称为config.php 要使Cacti系统能够正确访问并使用数据库,必须修改config.php文件,确保数据库连接参数正确无误。

1
2
3
4
5
6
7
8
9
10
[root@centos1 cacti]# vim include/config.php
/* make sure these values refect your actual database/host/user/password */
$database_type = "mysql"; //数据库类型
$database_default = "cacti"; //数据库名称
$database_hostname = "localhost"; //数据库服务器的地址
$database_username = "cacti"; //授权用户
$database_password = "cacti"; //授权密码
$database_port = "3306"; //数据库服务的端口
$database_ssl = false;
$url_path = "/";

4.3 Cacti的初始化安装

①调整httpd配置
修改httpd服务的主配置文件,设置好网站根目录、自动索引页、默认字符集等相关参数,然后重新加载httpd服务。

1
2
3
4
5
6
7
[root@centos1 cacti]# vim /etc/httpd/conf/httpd.conf
DocumentRoot "/var/www/html/cacti" //cacti源码目录作为网站根目录
<Directory "/var/www/html/cacti">
DirectoryIndex index.php index.html index.html.var //第一默认首页为index.php
AddDefaultCharset UTF-8 //默认字符集为UTF-8
[root@centos1 cacti]# service httpd reload
Reloading httpd:

②初始化Cacti系统
添加防火墙策略

1
2
[root@centos1 cacti]# iptables -I INPUT -p tcp --dport 80 -j ACCEPT
[root@centos1 cacti]# iptables -I INPUT -p tcp --dport 3306 -j ACCEPT

在浏览器中访问Cacti服务器的Web服务,初次访问时将会自动跳转至Cacti安装指南界面。
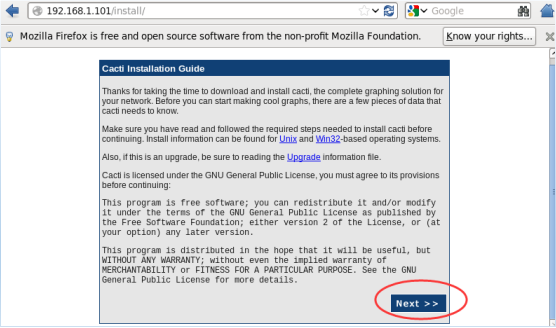
image-20191120112018964

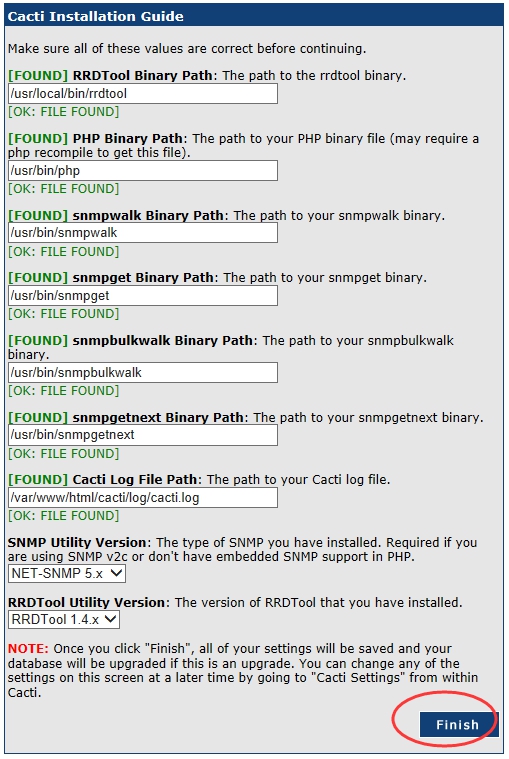
到此会检测系统配置文件,都OK即可继续下一步

img

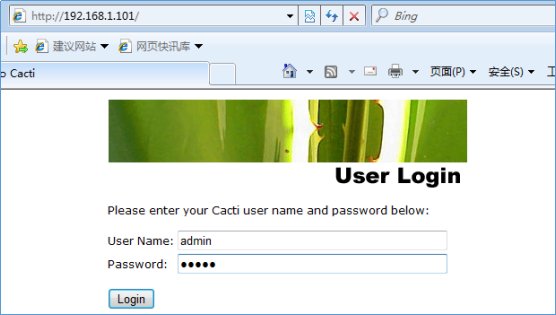
登录系统,初此登录用户和密码为:admin ,系统会提示修改密码才能登录

image-20191120112058270

4.4 客户机配置(被控端—-snmpd)

无论是交换机、路由器,还是Linux或Windows服务器,只要正确支持SNMP协议,并允许Cacti服务器采集数据,就能够进行集中监测。下面仅介绍Linux服务器中启用SNMP支持并设置共同体名(识别及验证字串)的简单方法。

安装并配置snmp服务

1
2
3
4
5
6
[root@centos2 ~]# vim /etc/snmp/snmpd.conf
[root@centos2 ~]# yum -y install net-snmp lm_sensors
[root@centos2 ~]# vim /etc/snmp/snmpd.conf
com2sec notConfigUser 192.168.1.101 public
access notConfigGroup "" any noauth exact all none none
view all included .1 80

第41行:192.168.1.101为Cacti服务器地址(默认为default),表示允许其查询本机数据;public表示SNMP共同何名称,用来识别及验证。
第62行:all表示开放所有的SNMP查询权限(默认是SystemView)。
第85行:去掉开头的注释符号,以便支持各种查询访问。

1
2
3
4
[root@centos2 ~]# service snmpd start
Starting snmpd: [ OK ]
[root@centos2 ~]# netstat -anpu | grep snmpd
udp 0 0 0.0.0.0:161 0.0.0.0:* 9723/snmpd

添加防火墙策略

1
[root@centos2 ~]# iptables -I INPUT -p udp --dport 161 -j ACCEPT

4.4 使用Cacti的Web控制台

4.4.1 添加被控端

①添加被控设备或主机
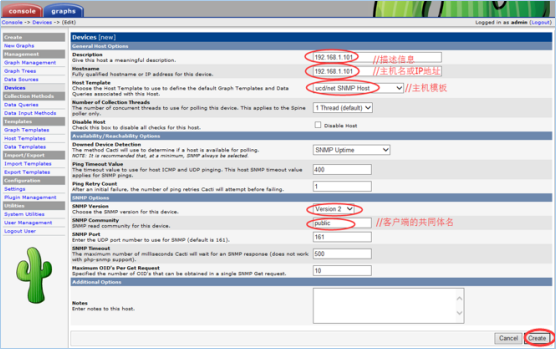
依次打开控制面板下的Management — Devices 完成以下操作

image-20191120112341349

配置完后点击右下角的创建,并再次点击右下角的保存

image-20191120112355693

成功连接被控端后会看到“Save Successful”的提示信息。

image-20191120112410819

②设置要监测的项目

image-20191120112432916

4.4.2 生成监测图像

在Cacti管理控制台中设置好被控端以后,需要为每个监测项目生成直观的图像,然后再将图像添加到监测树,以方便集中查看。
①创建图像(点击再次右下角Create完成创建)
依次打开控制面板下的Create — New Graphs 完成以下操作
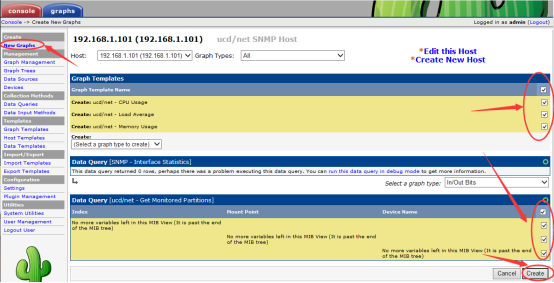
image-20191120112503526

②添加图像至监测树
依次打开控制面板下的Management — Graph Tress —- Defalt Tree 完成以下操作

image-20191120112519275

添加监测主机

image-20191120112532028

确认添加主机无误后,点击右下角创建

image-20191120112547076

再次确认添加主机无误后,点击右下角保存

image-20191120112604186

4.4.3 定期采集监测数据

Cacti系统通过poller.php页面来采集监测数据,需使用PHP程序解释执行。为了获得持续稳定的数据,应结合计划任务定期进行采集,如:每5分钟(poller.php页面默认刷新时间)。
①执行首次数据采集,会发现有发下报错(大致内容是说时区应该改成’Asia/Chongqing’)

1
2
3
4
5
6
7
8
9
10
11
[root@centos1 ~]# /usr/bin/php /var/www/html/cacti/poller.php
PHP Warning: date(): It is not safe to rely on the system's timezone settings. You are *required* to use the date.timezone setting or the date_default_timezone_set() function. In case you used any of those methods and you are still getting this warning, you most likely misspelled the timezone identifier. We selected 'Asia/Chongqing' for 'CST/8.0/no DST' instead in /var/www/html/cacti/lib/functions.php on line 486
OK u:0.00 s:0.01 r:0.44
10/23/2016 07:05:48 PM - SYSTEM STATS: Time:0.5271 Method:cmd.php Processes:1 Threads:N/A Hosts:3 HostsPerProcess:3 DataSources:16 RRDsProcessed:15
OK u:0.00 s:0.01 r:0.45
OK u:0.00 s:0.01 r:0.46
OK u:0.00 s:0.01 r:0.47
OK u:0.00 s:0.01 r:0.48
OK u:0.00 s:0.01 r:0.49

修改第946行去掉注释并改时区为’Asia/Chongqing’

1
2
[root@centos1 ~]# vim /etc/php.ini
date.timezone = 'Asia/Chongqing'

写入任务计划

1
2
[root@centos1 ~]# crontab -u cacti -e
/usr/bin/php /var/www/html/cacti/poller.php > /dev/null

4.4.4 查看监测结果

image-20191120112724444

4.4.5 安装percona-mysql-monitor插件,实现对MySQL服务的监控

借助 cacti+rrdtool 强大的绘图功能、加上专用的 mysql 模板、能够灵活快速的创建对多个 MySQL 实例的监测
Cacti工具默认的模板只能监控机器的CPU、内存和磁盘等信息,如果要监控MsSQL,要从percona公司的网站http:/www.percona.com/donwloads/上下载监控MySQL模板并安装。
①安装percona-mysql-monitor插件

1
2
3
[root@centos1 ~]# tar zxf percona-monitoring-plugins-1.1.4.tar.gz 
[root@centos1 ~]# cd percona-monitoring-plugins-1.1.4/cacti/scripts/
[root@centos1 scripts]# cp ss_get_mysql_stats.php /var/www/html/cacti/scripts/

②从本地文件导入模板(此步操作必需在主控服务器上进行)
依次打开控制面板的Import/Esport — Import Templates 完成以下操作
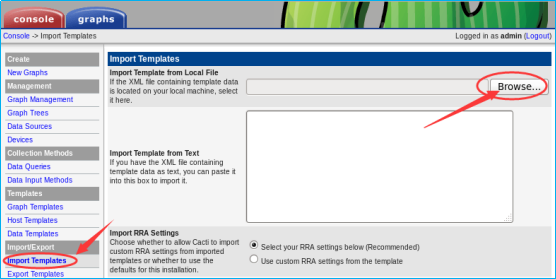
image-20191120112804792

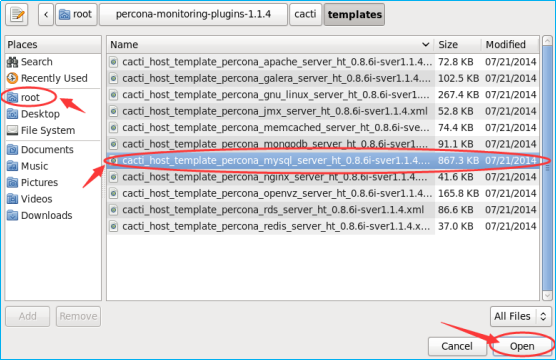
依次打开以下目录

1
/root/percona-monitoring-plugins-1.1.4/cacti/templates/cacti_host_template_percona_mysql_server_ht_0.8.6i-sver1.1.4.xml

点击右下角的Open 后再次点击右下角的Import完成导入

image-20191120112828296

③导入完成以后,添加模板
依次打开控制面板的Templates — Host Templates 完成以下操作
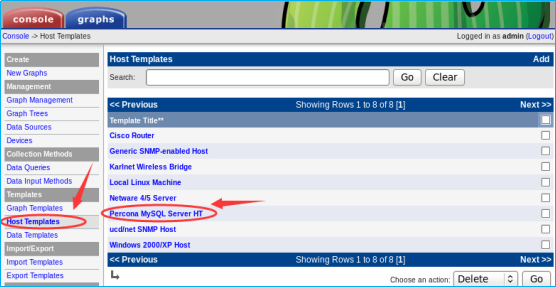
image-20191120112855505

打开Percona MySQL Server HT 后点击右下角Save保存
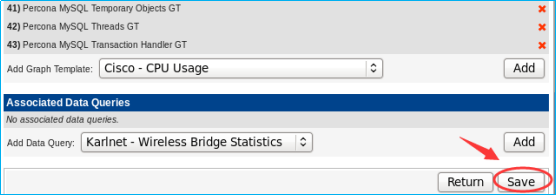
image-20191120112910044

④创建图像
依次打开控制面板的 Management — Devices 完成以下操作

image-20191120112928363

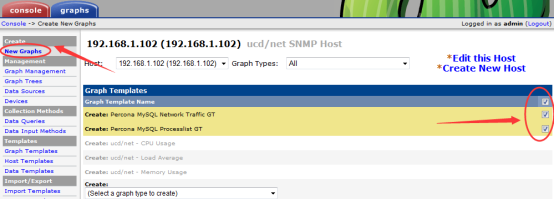
依次添加Percona MySQL Network Traffic GT和Percona MySQL Processlist GT
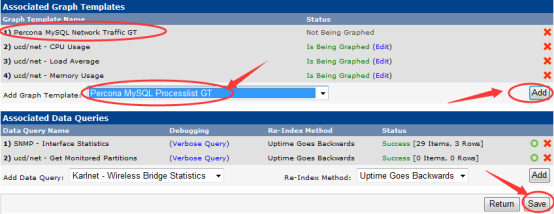
image-20191120112941331

⑤添加网络图

image-20191120112955890

⑥修改cacti连接mysql的用户,密码

1
2
3
[root@centos1 scripts]# vim /var/www/html/cacti/scripts/ss_get_mysql_stats.php
$mysql_user = 'cacti';
$mysql_pass = 'cacti';

⑦在被监控主机上创建Cacti用户,密码为
Cacti(跟/var/www/html/cacti/scripts/ss_get_mysql_stats.php中用户,密码保持一致)

1
2
3
4
5
6
7
8
9
10
11
12
13
14
15
[root@centos2 ~]# mysql -u root -p
Enter password:
Welcome to the MySQL monitor. Commands end with ; or \g.
Your MySQL connection id is 3
Server version: 5.5.38-log Source distribution

Copyright (c) 2000, 2013, Oracle and/or its affiliates. All rights reserved.

Oracle is a registered trademark of Oracle Corporation and/or its
affiliates. Other names may be trademarks of their respective
owners.

Type 'help;' or '\h' for help. Type '\c' to clear the current input statement.
mysql> grant process,super on *.* to 'cacti'@'%' identified by 'cacti';
Query OK, 0 rows affected (0.00 sec)

⑧添加防火墙策略

1
[root@centos2 ~]# iptables -I INPUT -p tcp --dport 3306 -j ACCEPT

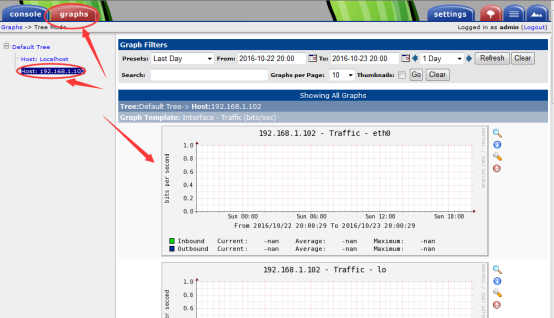
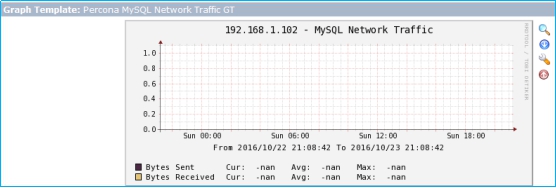
⑨查看MySQL流量图(刚添加可能没有图像,此处需要等待几分钟……)

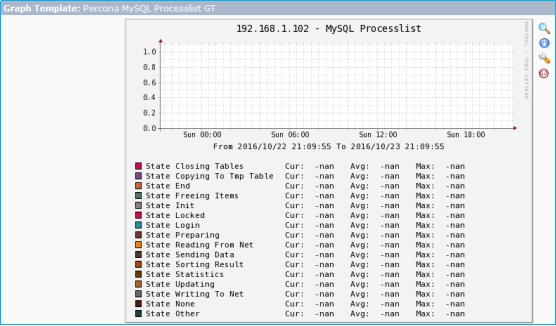
img

img

-------------本文结束感谢您的阅读-------------